
Face milling is a key CNC machining process that focuses on producing smooth, flat surfaces. This method is widely used in industries like aerospace and automotive where precise surface quality matters. This guide explains the process, tools, and helpful tips to make face milling efficient and reliable.
Introduction
Face milling is a straightforward machining technique. Its primary purpose is to flatten surfaces and prepare parts for additional work or assembly. Unlike traditional milling methods, face milling positions the cutting tool perpendicular to the workpiece. This arrangement allows the cutting face of the tool to do most of the work, making it highly effective for surface finishing.
Understanding Face Milling
Face milling involves using a specialized cutting tool to remove material from the top surface of a workpiece. It differs from peripheral milling, where the tool’s side edges handle the cutting. This technique allows for even material removal and consistent finishes, making it perfect for machining flat surfaces.
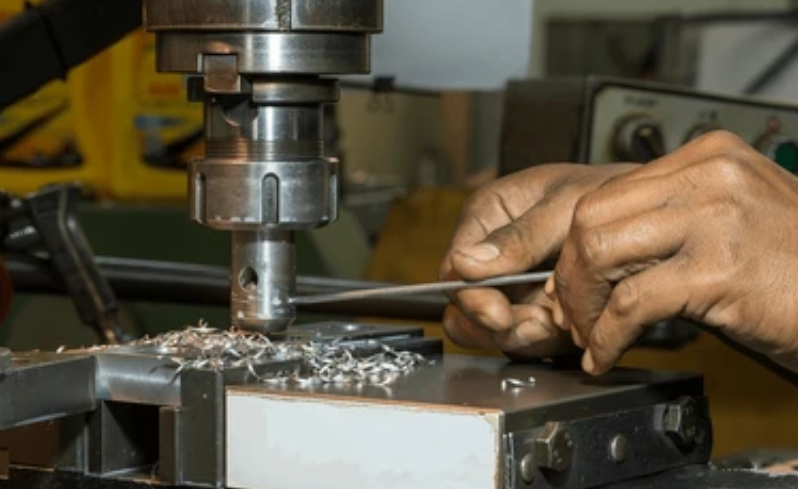
The process can be manual or automated. In manual milling, the machinist controls the feed rate by hand, which can lead to variability. Automated CNC milling, however, provides steady speeds and feeds, ensuring accuracy and reducing errors.
How the Face Milling Process Works
Face milling involves four main steps:
- Positioning the Workpiece
The workpiece must be securely clamped to the machine table. A stable setup prevents movement, which could compromise accuracy or damage tools. - Setting Up the Milling Machine
The milling tool is positioned perpendicular to the workpiece, ensuring the top of the cutter handles the cutting. Proper alignment is key to achieving a smooth finish. - Adjusting Feed Rate and Spindle Speed
These parameters depend on the material being worked on and the desired surface quality. Proper adjustments help reduce tool wear and improve cutting efficiency. - Machining Phase
The milling machine follows programmed instructions to cut the workpiece accurately. In CNC setups, this ensures consistent results and repeatable processes.
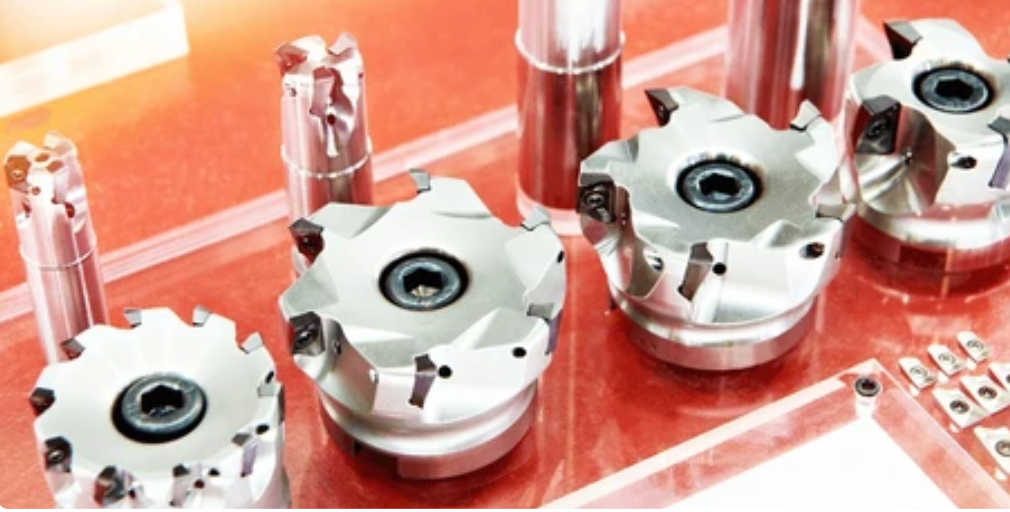
Tools Used in Face Milling
- Shell Mills
These are versatile tools with multiple cutting edges. They are ideal for removing large amounts of material and producing consistent finishes. - End Mills
End mills are suitable for intricate designs and aesthetic finishes. However, they are less effective for heavy material removal due to their smaller cutting edges. - Fly Cutters
Fly cutters have a single cutting edge and are used for fine finishes. They operate at slower speeds and are often chosen for soft materials or precise work.
Choosing the Right Tool

- Material Type: Use shell mills for hard materials and fly cutters for soft ones.
- Detailed Work: End mills are a good choice for intricate designs.
- Entry Angles: 45° tools are versatile, while 90° tools suit sharp edges.
- Feed and Speed: Match these settings to the tool and material to prevent wear.
- Automation: Automated setups provide better consistency than manual operations.
Types of Face Milling Operations
- General Face Milling
- Used to create flat surfaces.
- Best with 45° entry-angle tools.
- Ensure the cutter’s diameter is at least 20–50% larger than the workpiece.
- Heavy-Duty Face Milling
- Removes large amounts of material.
- Requires powerful machines and 60° entry-angle tools.
- Regularly clear chips to avoid recutting and tool wear.
- High-Feed Milling
- Focuses on high-speed cutting with feed rates over 1000m/min.
- Low-angle tools (10°) minimize chip thickness, enhancing efficiency.
- Surface Finishing with Wiper Inserts
- Uses specialized inserts to improve surface quality.
- Often paired with standard inserts to maintain smooth finishes.
Face Milling vs. Peripheral Milling
| Aspect | Face Milling | Peripheral Milling |
| Tool Orientation | Perpendicular to the workpiece | Parallel to the workpiece |
| Cutting Action | Uses the tool’s face | Uses the tool’s sides |
| Applications | Flattening and surface finishing | Deep grooves and material removal |
| Machine Compatibility | Suitable for vertical or horizontal spindles | Limited to horizontal spindles |
Practical Tips for Better Face Milling
- Keep Tools Sharp
Sharp tools produce better results and reduce wear on harder materials. - Dedicated Setups
Use specific setups for face milling instead of relying on generic arrangements. - Adjust Parameters Carefully
Calibrate feed rate, depth of cut, and spindle speed for the material and tool. - Avoid Overlapping Cuts
Repeated entry and exit points can dull tools and damage workpieces. - Declutter Workspace
Clear chips regularly to prevent them from reentering the cutting path.
Final Thoughts
Face milling is a reliable process for creating smooth, flat surfaces. Understanding the tools, techniques, and adjustments involved can greatly improve outcomes. By following these practical tips and using the right equipment, machinists can achieve precise and consistent results across various applications.
FAQs
- How does face milling differ from end milling?
Face milling uses the tool’s top for cutting, while end milling uses both the sides and end. - What are the main tools used in face milling?
Common tools include shell mills, end mills, and fly cutters. - Is face milling possible without automation?
Yes, but CNC systems offer better accuracy and efficiency. - What is the recommended entry angle for general face milling?
A 45° entry angle is ideal for most operations. - Which tool is best for softer materials?
Fly cutters are excellent for soft materials due to their precision and slower operation.
![]()

1 thought on “A Complete Overview of Face Milling”