From this article, you will learn everything about reaming in machining—what it is, how to ream a hole step-by-step, different types of reamers, common issues, CNC reaming, and expert tips to achieve perfect hole tolerances and surface finishes. Ideal for engineers and manufacturing professionals.
What is Reaming?
Reaming is the process of enlarging an existing hole with a precision tool called a reamer to achieve a high-quality finish and tight tolerances. It’s a finishing operation—not for removing a ton of material, but for dialing in accuracy and smoothness. Think of it like smoothing the rough edges after carving a masterpiece.
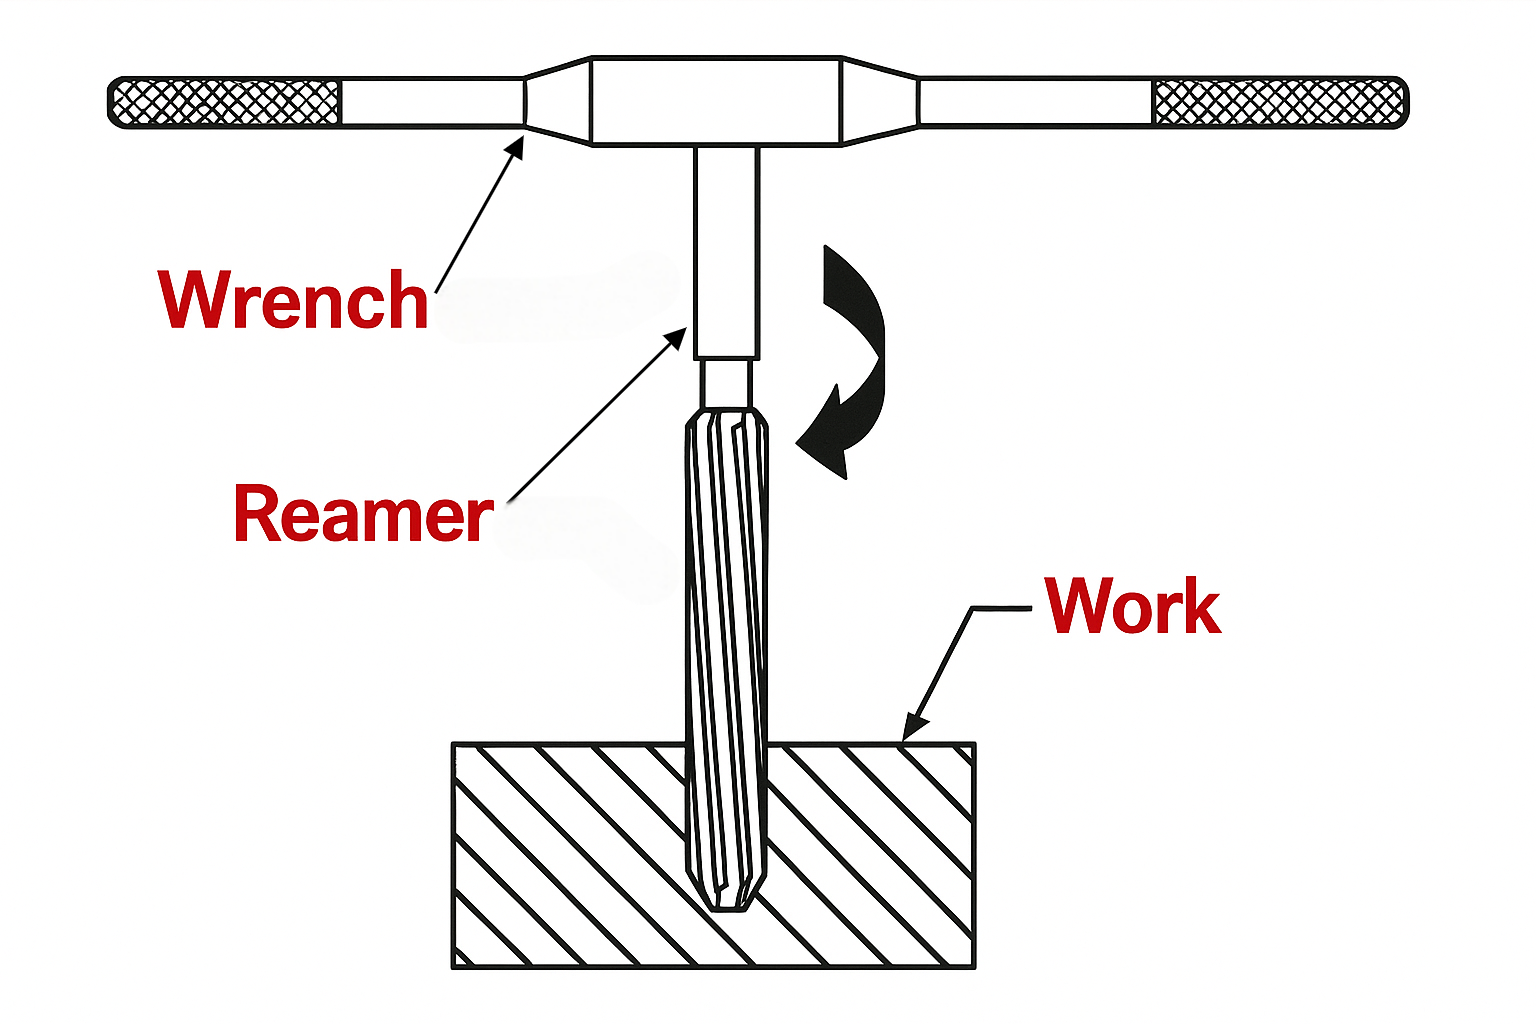
Here’s how it works: A reamer is inserted into a pre-drilled hole and spun—usually at a slower speed than a drill—to shave off just enough material to make the hole rounder, smoother, and exactly the right size. It’s often used in metalworking, but it’s also applied to plastics and composite materials.
This tool doesn’t act like a grinder or a typical drill—it cuts more precisely and consistently along its fluted edges. The amount of material removed during reaming is typically very small, often between 0.1 mm to 0.3 mm (or about 0.004 to 0.012 inches). It’s the precision that counts.
Reaming tools can be manual (hand reamers) or machine-driven (chuck or CNC reamers) depending on the job. While you might see reaming in small workshops, it’s widely used in aerospace, automotive, and manufacturing industries where exact fits are non-negotiable.
How To Ream A Hole: A Step-by-Step Guide
Step 1: Secure the Workpiece
Before anything else, lock down your workpiece. If it moves even slightly during the reaming process, you’re in for a world of trouble. Use vises, clamps, or fixtures to make sure the part is rock-solid. The tighter the hold, the more accurate the result.
Step 2: Drill the Initial Hole
You can’t just shove a reamer into raw material and expect results. Start with a drilled hole. Pro tip: drill the hole 2-4% smaller than your desired final diameter. For softer materials, use a 4% undersize; for harder ones, go with 2%.
Step 3: Choose the Right Reamer Size
Pick a reamer that matches the exact final diameter you’re targeting. If you’re reaming a 10 mm hole, you need a 10 mm reamer—not 10.1 mm, not 9.9 mm. Reamers are not adjustable (unless you use a special type), so choosing the right one is critical.
Step 4: Apply Correct Speed, Feed, and Lubrication
Slower is better here. Use half the RPM you used during drilling and twice the feed rate. Reaming tools are designed for higher feed but lower speed. Don’t forget to use cutting oil or coolant—this reduces heat and improves finish.
Step 5: Execute the Reaming Process
Insert the reamer slowly into the hole while it’s spinning. Keep a steady, even pressure. Don’t force it. The tool will do the work. When you reach the bottom, don’t reverse—just turn off the machine and carefully pull the tool straight out.
Step 6: Finishing Touches and Cleanup
Deburr the top and bottom of the hole with a countersink tool, and clean the hole with compressed air or a brush. Check the diameter with a micrometer or plug gauge to confirm your work. Done right, the result should be a mirror-finish, precision-sized hole.
What is the Purpose of Reaming?
Dimensional Accuracy
The main purpose of reaming is to achieve dimensional accuracy. When a project calls for a hole that’s exactly 10.00 mm, a drill bit alone often won’t cut it. It might leave you with 9.95 mm or 10.08 mm—close, but not perfect. Reaming bridges that gap.
Because reamers are manufactured to tight tolerances themselves, they can reliably produce hole diameters with tolerances as tight as ±0.005 mm (±0.0002 in). This level of precision is invaluable in parts that need to fit together with almost no wiggle room—like in aerospace, robotics, or medical implants.
Surface Finish Improvement
Another huge benefit of reaming? The surface finish. Holes that are drilled or bored might look okay to the naked eye, but under a microscope (or under stress), rough internal surfaces can cause friction, wear, or failure.
Reaming produces surfaces with a finish as fine as Ra 0.2 µm, depending on the reamer and material. This smoothness isn’t just about aesthetics—it’s about reducing friction, preventing corrosion, and ensuring long-term reliability of the assembled components.
Hole Tolerance Control
Hole tolerance isn’t just a fancy spec in a manual—it’s the blueprint for how parts fit together. A press fit, for example, might require a hole tolerance of +0.0000 in / -0.0005 in. Reaming is often the only method that can consistently achieve these tolerances, especially in harder metals like steel or titanium.
That makes reaming essential in assembly line manufacturing, where consistency is key. Whether you’re making 10 or 10,000 parts, a reamer helps ensure every single hole is identical—no guesswork, no surprises.
Different Types of Reamers

Hand Reamers
These are your manual go-tos. Hand reamers have a slight taper on the tip to help them center themselves in the hole. They’re ideal for jobs where precision matters but machine reaming isn’t feasible.
Machine (Chuck) Reamers
Used with lathes, drill presses, or milling machines, machine reamers are made for consistent, high-speed operations. They’re your best bet for mass production and tight tolerances.
Shell Reamers
These are large-diameter reamers used with shell reamer arbors. The shell design allows for easy replacement of worn tools, saving money over time—perfect for reaming big holes in production environments.
Carbide Reamers
When you’re dealing with tough materials like stainless steel or titanium, carbide reamers are your best friend. They last longer and cut cleaner thanks to their hard cutting edges.
Adjustable Reamers
Need flexibility? These reamers have movable blades so you can tweak the diameter slightly. They’re useful when tolerances are tight, but your pre-drilled hole sizes vary.
Floating Reamers
These are used in CNC setups where alignment issues could cause problems. They “float” slightly in the spindle, compensating for minor misalignment and ensuring a clean cut.
Common Problems that Occur During Reaming
Undersized or Oversized Holes
One of the most common headaches during reaming is ending up with holes that are either too tight or too loose. An undersized hole can result from using a reamer that hasn’t been properly maintained or when the reamer just rubs against the material instead of cutting it cleanly. This happens a lot when the reamer is dull, or there’s not enough stock left from the drilling process to cut effectively.
On the flip side, oversized holes are usually caused by misalignment or excessive tool wear. If the reamer is not aligned correctly with the drilled hole, or if it’s wobbling due to spindle run-out, you’ll likely see a hole that’s bigger than intended. This can also occur if the feed rate is too aggressive or if vibration isn’t properly controlled.
Chattering and Vibration Issues
Nothing ruins a reaming job like chatter—that irritating sound of a vibrating tool eating into your material. It doesn’t just sound bad; it causes visible defects. The surface finish turns out rough, and in severe cases, it can damage the reamer itself. Chatter usually results from a lack of machine rigidity, excessive tool overhang, or improper speed and feed settings.
To prevent this, keep the setup tight, minimize the overhang of the reamer, and use proper lubrication. Increasing feed rate slightly or reducing speed often helps reduce chatter. Also, ensure your machine is in good condition with no play or backlash.
Tool Breakage and Wear
Tool life is a major concern in reaming operations. If you’re noticing premature wear, it could be due to several reasons:
Incorrect feed/speed
Poor quality material
Inadequate lubrication
Reaming too much material
A worn reamer won’t cut accurately and can even break inside the hole, creating a costly and time-consuming mess. To avoid this, inspect your tools regularly and regrind or replace them when necessary.
Tips and Precautions for Reaming Operations

Managing Feed and Speed Settings
Let’s talk numbers. Reaming typically requires slower speeds and higher feeds than drilling. As a general rule:
RPM: Half to two-thirds of your drilling speed
Feed rate: 2x the feed used for drilling
This ensures the reamer doesn’t just burnish the hole but actually cuts the material. Going too slow can cause rubbing, while excessive speed can lead to chatter and poor finishes.
Ensuring Proper Tool Alignment
Perfect alignment is non-negotiable. If your reamer isn’t perfectly concentric with the hole, the result will be anything but precise. You’ll often end up with bell-mouthed holes or tapered finishes. Misalignment is commonly caused by:
Worn spindles
Misaligned chucks or collets
Improper workpiece setup
To fix this, double-check your machine’s calibration and use floating reamer holders if your setup isn’t rigid enough.
Tool Maintenance and Regrinding
Don’t wait for your reamer to fail before you think about maintenance. Over time, cutting edges get dull, and a dull reamer means poor performance. Regrinding the chamfer (the cutting edge) can extend the tool’s life significantly, but it must be done with care. Each flute must be sharpened evenly, or you risk cutting an oversized or oval hole.
It’s best to track reamer usage hours and schedule maintenance accordingly. Never try to sharpen a reamer by hand unless you’re trained to do so.
Avoiding Chatter and Poor Finishes
Chatter is a surface finish killer. Besides proper speed/feed settings, here are a few ways to prevent it:
Keep your machine and setup rigid
Use shorter tools with less overhang
Make sure your reamer fits snugly in the holder
Don’t skimp on lubrication—cutting fluids help reduce friction and temperature
Also, make sure you don’t stop the reamer mid-cut. Once started, let it go all the way through in one motion for the cleanest cut.
How to Determine the Size of Ream Hole
Stock Allowance Guidelines
The size of the hole before reaming—called the pre-ream diameter—is critical. Leave too little stock, and the reamer won’t cut. Leave too much, and it might grab, chatter, or break. Here’s a practical stock allowance guide:
For holes under 1/4″: leave about 0.010″
For holes around 1/2″: leave 0.015″
For holes over 1″: leave up to 0.025″
For hand reaming, reduce this significantly to 0.001″ to 0.003″, since manually pushing the tool requires less resistance.
Reamer vs. Drill Size Rules of Thumb
Still unsure about what size to drill before reaming? Use this simple formula:
Drill Size = Reamer Size – (2% to 4%)
Choose 2% under for hard metals like steel or titanium. Use 4% under for softer materials like aluminum or plastic. This helps leave just the right amount of material for the reamer to cleanly cut without distortion.
For example:
Reamer Size: 10 mm
Drill Size for Steel (2% under): 9.8 mm
Drill Size for Aluminum (4% under): 9.6 mm
Following these guidelines helps ensure your reaming operation finishes with a perfect, clean, and accurate hole.
Reaming vs. Boring vs. Drilling: What Are the Differences?

Let’s break it down simply. These three processes all deal with making or improving holes, but each has its own purpose and tools:
| Feature | Drilling | Boring | Reaming |
| Purpose | Create initial hole | Enlarge or align hole | Finish hole to exact size |
| Tool | Twist drill bit | Boring bar or head | Multi-flute reamer |
| Material Removed | Large amount | Moderate amount | Small, precise amount |
| Surface Finish | Rough | Moderate | Excellent |
| Tolerance | ±0.005” or worse | ±0.001” to ±0.002” | ±0.0005” or better |
| Used When | Making a new hole | Fixing hole location/size | Perfecting final hole size |
So, when do you choose each?
Use drilling to start a hole.
Use boring to fix location errors or go larger.
Use reaming for final sizing and finishing.
Reaming won’t work without a pre-existing hole—it’s a finishing operation, not a starting one.
When to Choose Reaming over Boring?
Factors Favoring Reaming
Reaming is often the better choice when:
You need high productivity—reaming is faster than boring for final sizing.
Your project calls for tight tolerances and smooth finishes.
You have many identical parts to produce—reamers offer excellent repeatability.
In contrast, boring is ideal when you’re dealing with:
A misaligned or offset hole
The need to adjust hole size on the fly
Irregular shapes or deep holes
Application Scenarios
Here are some situations where reaming is your go-to:
Precision bearings in automotive or aerospace parts
Medical components where tolerances are life-critical
Assembly lines where speed and uniformity are everything
Hardened steel parts where boring might be too slow or rough
Reaming isn’t just about cutting—it’s about cutting right. If you want the cleanest, smoothest, and most accurate hole possible, reaming is your answer.
CNC Reaming Explained
What is CNC Reaming?
CNC reaming is simply the process of performing reaming operations on a Computer Numerical Control (CNC) machine. The beauty of CNC reaming lies in its precision and repeatability. While manual reaming can introduce slight inconsistencies depending on the operator’s skill, CNC reaming removes human error from the equation. It’s all about precision, automation, and efficiency.
Here’s how it works: After a hole is pre-drilled (also via CNC), the machine is programmed to switch to a reamer tool and perform the finishing pass at pre-defined RPM, feed rate, and depth. Everything is controlled digitally, from tool paths to lubrication timing. This means that even complex parts with dozens of precision holes can be completed quickly and perfectly every single time.
The CNC setup allows for tight toolpath control, so there’s less risk of misalignment or tool deflection. Plus, with automatic tool changers, reamers can be swapped in and out without manual input—speeding up the process and keeping things consistent across hundreds or even thousands of parts.
CNC Reaming in High-Precision Industries
In industries where accuracy is king—aerospace, automotive, medical devices, electronics—CNC reaming is non-negotiable. Think of components like fuel injector nozzles, surgical implants, engine cylinders, and optical hardware. These parts require tolerances within microns, which only CNC-guided reaming can consistently deliver.
CNC reaming also reduces the chance of rework or scrapped parts, saving time and money on the production floor. With in-process monitoring and automatic compensation, it ensures real-time corrections and fewer surprises.
Bottom line? If your project demands ultra-precision and high-volume output, CNC reaming is your best friend.
Industrial Applications of Reaming
Automotive Industry
The automotive sector relies heavily on reaming for parts that demand tight tolerances. From engine cylinder bores to gearbox housings, suspension components, and valve guides, reaming helps ensure parts fit together without leaks or play.
With millions of parts rolling off production lines, consistency is key. Reaming provides that consistency at scale, giving manufacturers confidence that each part will perform identically to the last.
Aerospace Industry
In aerospace, there’s no room for error. A tiny misfit could lead to catastrophic failures. Reaming is used to perfect fastener holes, bearing housings, turbo components, and hydraulic assemblies.
These parts not only need to be precise but also lightweight and durable, which means working with tough materials like titanium and Inconel. Reaming ensures these critical holes meet the exact specifications, even in the hardest alloys.
Manufacturing & Assembly Lines
From electronics to heavy equipment, manufacturing plants use reaming across countless applications—hydraulic blocks, mold inserts, press-fit bushings, and more.
Wherever two components are meant to be mated with precision—whether press-fit, interference-fit, or slip-fit—you’ll find reaming at the heart of the process. Assembly lines especially benefit from high-speed machine reaming, which keeps productivity high and errors low.
Advanced Techniques and Innovations in Reaming
Coated Reamers
Today’s reaming tools aren’t just high-speed steel anymore. They’re coated with advanced materials like TiN (Titanium Nitride), TiAlN (Titanium Aluminum Nitride), or even diamond-like carbon (DLC). These coatings enhance tool life, reduce friction, and allow for faster cutting speeds—especially useful in high-production environments or with abrasive materials.
These coatings also help when you’re reaming composites, ceramics, or heat-treated steels, where traditional reamers would wear down quickly.
High-Speed Reaming
High-speed reaming is all about efficiency without sacrificing accuracy. By optimizing the feed rates and cutting speeds, manufacturers can reduce cycle time significantly. This is particularly important in high-volume production, where saving a few seconds per part adds up to hours—or even days—of efficiency gains.
To do this effectively, you’ll need:
High-quality carbide reamers
Rigid machine setups
Controlled coolant delivery systems
Precision tool holders
When done right, high-speed reaming produces mirror-like finishes even at 2–3 times the normal cutting speed.
Smart Monitoring Systems
We’re now entering the age of Industry 4.0, and reaming isn’t getting left behind. Modern reaming machines and tools are integrated with sensor systems that monitor:
Cutting force
Tool wear
Vibration (chatter)
Temperature
These systems feed data back into the CNC controller or MES (Manufacturing Execution System), allowing for real-time tool adjustments or maintenance alerts. This prevents tool failures before they happen and ensures you’re always cutting with optimal performance.
Get A Perfect Hole Machining Service
Choosing the Right Machining Partner
No matter how good your reaming knowledge or your reamers are, the quality of the final part depends heavily on who’s doing the machining. Finding the right partner means looking for:
Experience with tight-tolerance projects
Access to CNC equipment
In-house quality control and inspection tools
A track record in your specific industry
Whether it’s prototyping or full-scale production, the right partner can ensure your holes are reamed perfectly—every single time.
Quality Control and Certification
A great hole is one that’s proven to be perfect, not just assumed. Look for machining shops that offer comprehensive quality checks using:
Coordinate Measuring Machines (CMM)
Bore gauges and micrometers
Surface roughness testers
Also, certifications matter. If you’re in aerospace, automotive, or medical fields, make sure your supplier is ISO 9001, AS9100, or ISO 13485 certified. This ensures your parts aren’t just made—they’re made right.
Conclusion
Reaming is one of those finishing touches in machining that makes the difference between adequate and exceptional. It’s the final pass that brings precision, smoothness, and fit to your drilled or bored holes. Whether you’re building race cars, rocket engines, or robotic arms, reaming ensures everything aligns, fits, and functions with confidence.
From manual reamers to CNC setups, and from basic steel parts to exotic alloys, reaming proves its value again and again. But remember—it’s not just about the tool. It’s about understanding the process, using the right speeds and feeds, ensuring perfect alignment, and maintaining your tools properly.
When done right, reaming can elevate the quality of your machining game and take your components from good to flawless.
FAQs
1. What are the main uses of a reamer?
Reamers are used to finish and size pre-drilled holes, providing smoother internal surfaces and tighter dimensional tolerances for mating parts.
2. Can you ream a hole without drilling first?
No. Reaming requires an existing hole. It’s a finishing operation, not a primary cutting process. Drilling or boring comes first.
3. How much material should be left for reaming?
Typically, leave 0.010” to 0.015” of material for machine reaming. For small holes, around 0.003” to 0.006” is enough.
4. What causes chatter during reaming?
Chatter is caused by machine vibrations, tool overhang, improper speed/feed, and lack of rigidity in the setup. Fixing these helps reduce or eliminate chatter.
5. How do I choose the right reamer type?
Choose based on:
Material being cut (use carbide for tough metals)
Hole size
Production volume (use machine or CNC reamers for high volume)
Tolerances needed
![]()