


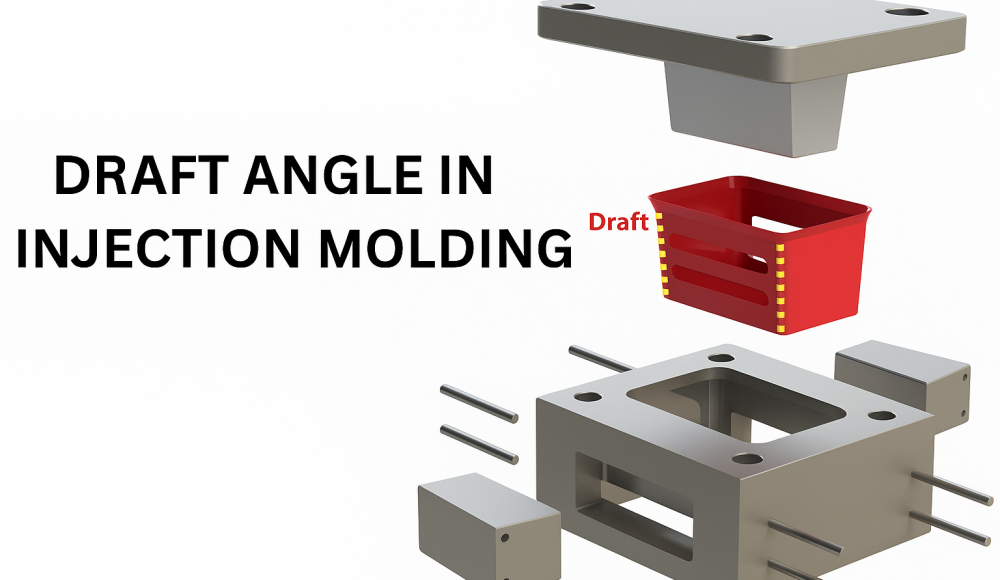
部品を設計するとき 射出成形, one of the most overlooked yet critical details is the ドラフト角度. A draft angle is not simply a cosmetic or optional feature—it directly affects how well a part releases from the mold, how long your tooling lasts, and how consistent your production cycle is.
Without sufficient draft, molded parts can stick to the mold cavity, 原因 drag marks, 変形, or even mold damage. These issues lead to longer cycle times, costly tool repairs, and reduced part quality. For efficient, 高品質の生産, understanding and applying proper draft angles is essential.
This guide will explain what a draft angle is, why it’s crucial, and how to apply draft design best practices for optimal mold performance and part quality.
What Is a Draft Angle?
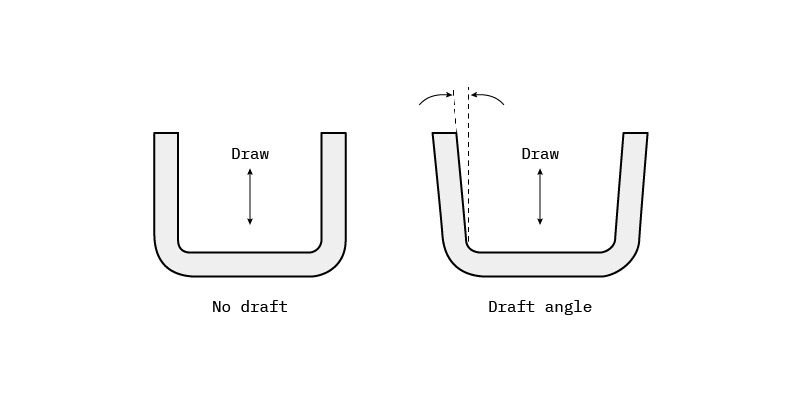
What Is a Draft Angle
あ ドラフト角度 です taper applied to vertical walls of an injection-molded part to help it release smoothly from the mold. It’s typically measured in 度 (°) and ensures that as the mold opens, parts don’t drag or scrape against the cavity walls.
こう考えてみてください: if the walls of a molded cup were perfectly straight, the part would create a vacuum or friction lock against the mold. A draft angle slightly widens the top, making it easier for the part to eject cleanly.
要するに, ドラフト角度:
Reduce friction between part and mold
Minimize ejection force
Prevent surface damage
Allow faster, more reliable production cycles
Benefits of Incorporating Draft Angles
Including draft angles in your part design leads to numerous benefits, both for manufacturing efficiency and product quality:
Reduces ejection force and friction between the mold and part surface
Prevents scuffing, drag marks, または反り, ensuring a smoother finish
Increases mold longevity by minimizing wear during ejection
Speeds up cycle times by allowing easier mold release
Improves part consistency across large production runs
Lowers rejection and scrap rates, reducing overall manufacturing cost
要するに, adding a draft improves not only the aesthetics and dimensional accuracy of your parts but also the 費用対効果 of your entire process.
Draft Angle Rules and Best Practices
1. Minimum Draft Angle: 1.5° to 2°
A minimum of 1.5°–2° is generally recommended for parts with mold depths up to 2 インチ (50 んん).
This is sufficient to prevent drag marks and allow reliable ejection.
At Grace Harness, our engineers typically recommend 2° or more to provide a safety margin—especially when surface finishes, 複雑なジオメトリ, or tight tolerances are involved.
2. Draft Direction: Toward the Mould Opening
Always apply draft in the direction of mold movement. When the mold opens, the cavity side moves upward or away, so the draft should follow that direction.
例えば, in a hollow box-shaped part, の top opening should be slightly wider than the bottom. This ensures that when the part is ejected, it doesn’t stick to the core or cavity walls.
3. Add 1° Draft per Inch of Depth
As the depth of a molded feature increases, so does the surface area and friction during ejection.
A good rule of thumb is to add 1° of draft for every 25 んん (1 インチ) of cavity depth.
例:
If your feature is 75 深さmm, you should include at least 3° of draft for smooth ejection and minimal tool wear.
4. Increase Draft for Textured or Etched Surfaces
Textured surfaces, such as those with matte, grain, or leather finishes, increase friction during ejection. 補うために, add additional draft based on surface roughness.
| Surface Finish Type | Recommended Draft |
| Smooth or Polished Surface | 1°–2° |
| Light Texture | 3° |
| Medium Texture | 4° |
| Heavy Texture or Deep Etch | 5° or more |
ヒント: Always confirm the texture depth (ミクロンで測定) with your mold supplier to determine the correct draft increment.
5. Account for Material Shrinkage and Flexibility
Different plastics behave differently as they cool. Materials that shrink more will grip the mold tighter, requiring a greater draft angle.
| 材料 | Minimum Draft (°) | Recommended Draft (°) | メモ |
| ナイロン (PA) | 0° | 1° | フレキシブル, releases easily |
| ポリエチレン (PE) | 0.5° | 1.5° | 低収縮, good flow |
| PVC | 0.5° | 1.5° | 硬い, needs slight draft |
| ポリプロピレン (PP) | 1° | 2° | Moderate shrinkage |
| ポリカーボネート (パソコン) | 1.5° | 2° | 脆い, benefits from higher draft |
General rule:
The higher the shrinkage or stiffness of the material, の greater the draft あなたが必要です.
6. Apply Draft to All Mould-Contacting Features
Draft is not limited to outer walls—every molded feature that contacts the mold should have draft to ensure proper release.
| Feature Type | Recommended Draft (°) |
| リブ | ≥ 0.5° |
| Boss Inner Diameter | ≥ 0.25° |
| Boss Outer Diameter | ≥ 0.5° |
| Gussets or Louvers | ≥ 1° |
This applies to internal cores, external cavities, and reinforcing features like ribs that strengthen thin walls.
7. Dual-Sided Draft for Symmetrical Parts
For parts that split along the centerline (like cylinders or domes), draft must be applied to both sides of the parting line.
Each side of the mold has its own release direction, so both surfaces need appropriate draft angles to prevent sticking.
8. Minimum Draft: Never Go Below 0.5°
Even in cases where you need nearly straight vertical walls, you should include at least 0.5° of draft on all vertical faces.
If your design absolutely demands straight geometry, consult with your mold maker to see if texture, 研磨, or parting line adjustments can help compensate.
覚えて: some draft is always better than none.
Common Design Mistakes to Avoid
Forgetting to apply draft to internal walls or ribs
Designing CAD models without integrated draft (causing rework later)
Not adjusting for texture or coating thickness
Ignoring material shrinkage behavior
Overcomplicating part geometry without considering mold release direction
Draft Is a Requirement, Not a Suggestion
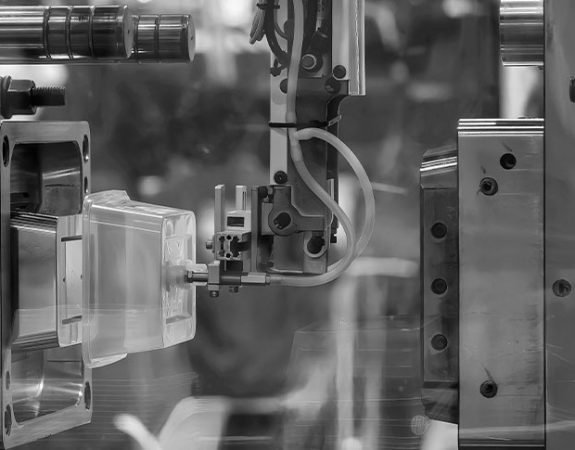
Draft Is a Requirement, Not a Suggestion
Designers often focus on part geometry, 美学, or functionality while overlooking manufacturability.
しかし, no matter how perfect your design looks on CAD, it cannot be molded efficiently without proper draft.
Inadequate draft leads to:
Part sticking or tearing
Mold damage and downtime
表面の仕上げが悪い
Increased scrap and maintenance costs
Always prioritize draft in your early design stages—it’s an essential part of 製造可能性のための設計 (DFM).
Advanced Tips from 精度の高いトップ
Integrate Draft Early:
Add draft angles during the CAD modeling stage. This ensures your prototype or 3D print already reflects realistic moldable geometry.
Perform DFM Analysis:
Before mold fabrication, run a DFM check to identify insufficient draft or complex release areas. Our team offers free DFM analysis to help you optimize mold design.
Collaborate with Toolmakers:
Discuss draft direction, parting line placement, and ejection methods early. Toolmakers can often suggest subtle adjustments that greatly improve manufacturability.
Test with Prototypes:
Use 3D printing or soft tooling to validate your draft design before committing to full-scale production.
Quick Draft Angle Reference Summary
| 要素 | Recommended Draft (°) |
| Smooth Surface | 1°–2° |
| Light Texture | 3° |
| Heavy Texture | 5°+ |
| Shallow Depth (<25 んん) | 1°–2° |
| Deep Cavity (>75 んん) | 3°–4° |
| PP or PC Material | 2° |
| Nylon or Flexible Plastics | 1° |
| リブ / ボス | 0.25°–0.5° |
結論
Draft angles may seem like a small design detail, but their impact on manufacturability is enormous. They protect your mold, improve part appearance, and lower production costs.
For successful injection molding:
追加 at least 1.5°–2° draft where possible
Increase for textured or deep parts
Account for material and geometry
Apply draft to every feature in contact with the mold
疑わしいとき, 覚えて: more draft = fewer problems.
続きを読む:
射出型の種類: カテゴリ, 特徴, および産業用アプリケーション
射出成形設計用のプラスチックリブ: ベストプラクティスとガイドライン
よくある質問
1. Why is draft angle important in injection molding?
Draft angles are essential to ensure smooth part ejection from the mold. ドラフトなし, parts can stick, ワープ, or damage the tool, resulting in costly downtime and poor-quality products.
2. What happens if I design a part without draft?
A part without draft will create high friction during ejection, often causing drag marks, ねじれ, またはさえ cracked parts. It also increases tool wear, which shortens mold life and raises maintenance costs.
3. How much draft should I add for textured surfaces?
For textured or grain-finished parts, increase the draft angle by 1°–2° beyond the base value. Heavily textured surfaces may require up to 5° or more depending on the depth of the pattern.
4. Does draft angle affect the appearance of my part?
はい, but positively. A properly designed draft ensures a smoother finish, fewer marks, and consistent color or texture after molding. Visually, the difference between 1° and 2° is barely noticeable to the naked eye.
5. Can I apply zero draft for aesthetic reasons?
While possible in rare cases, it’s risky. If you must use zero draft (for purely visual requirements), your mold maker may use special coatings or ejection systems, but this increases tooling cost and maintenance. 平 0.5°ドラフト is highly recommended as a minimum.
6. When should I add draft in the design process?
Add draft as early as possible in the CAD design stage. Applying it later can lead to geometry conflicts, やり直し, and costly delays before tooling. Incorporating draft from the start ensures a faster design-to-production workflow.

2 』への思い抜き勾配設計ガイド & ベストプラクティス: より良い離型性を実現する設計方法”