Pad printing, also known as tampography, is an advanced and precise printing method widely adopted by various industries. It enables the transfer of detailed 2D images onto surfaces of virtually any shape, including curved, concave, convex, or irregularly textured objects. Due to its versatility, cost-effectiveness, and superior printing accuracy, pad printing has become integral in industries ranging from consumer electronics to automotive and medical sectors.
This comprehensive guide will explore the pad printing process, its working principles, practical considerations, and diverse applications across industries.
What is Pad Printing?
Pad printing is a versatile printing technique that utilizes a flexible silicone pad to transfer ink from an etched printing plate (also known as a cliché) onto the targeted object or substrate. This method is particularly effective for intricate, precise details, even on challenging surfaces.
Notable characteristics of pad printing include:
Exceptional accuracy for small, detailed images.
Compatibility with irregular, uneven surfaces.
Capability to print with multiple colors efficiently.
Cost-effectiveness in small to medium production runs.
How Does Pad Printing Actually Work?
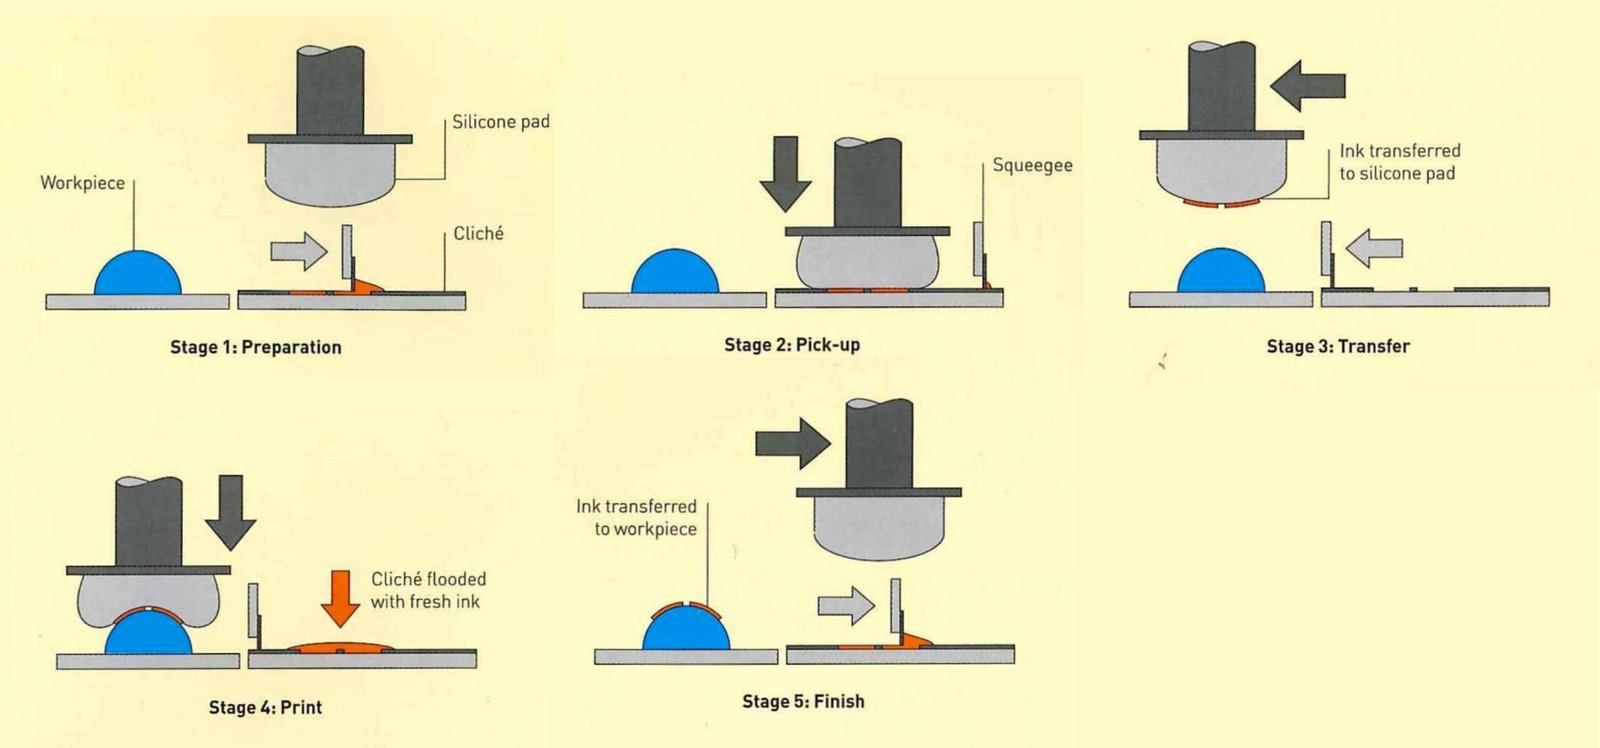
Step 1: Getting the Ink Ready (Home Position)
First, the pad printing machine moves an ink-filled cup over a printing plate, which has your design engraved onto it. The ink fills up these engraved grooves, making sure your image is ready for printing.
Step 2: Cleaning Up Extra Ink (Exposure to Air)
Next, the ink cup slides away, removing any leftover ink from the plate surface and leaving ink only inside the engraved parts. When the ink gets exposed to air briefly, it becomes slightly sticky—perfect for being picked up by the pad.
Step 3: Transferring the Image (Printing)
Here’s where the magic happens. The soft silicone pad gently presses down onto the engraved plate, picking up the sticky ink. Then it moves over to the object you’re printing on, pressing down and transferring the image neatly onto its surface, no matter how curved or irregular it is.
Step 4: Resetting for the Next Print (Next Cycle)
After the pad has transferred the ink, it lifts away, and the ink cup moves back over the plate. The process repeats: ink refills the engraved image, and everything is ready to go again.
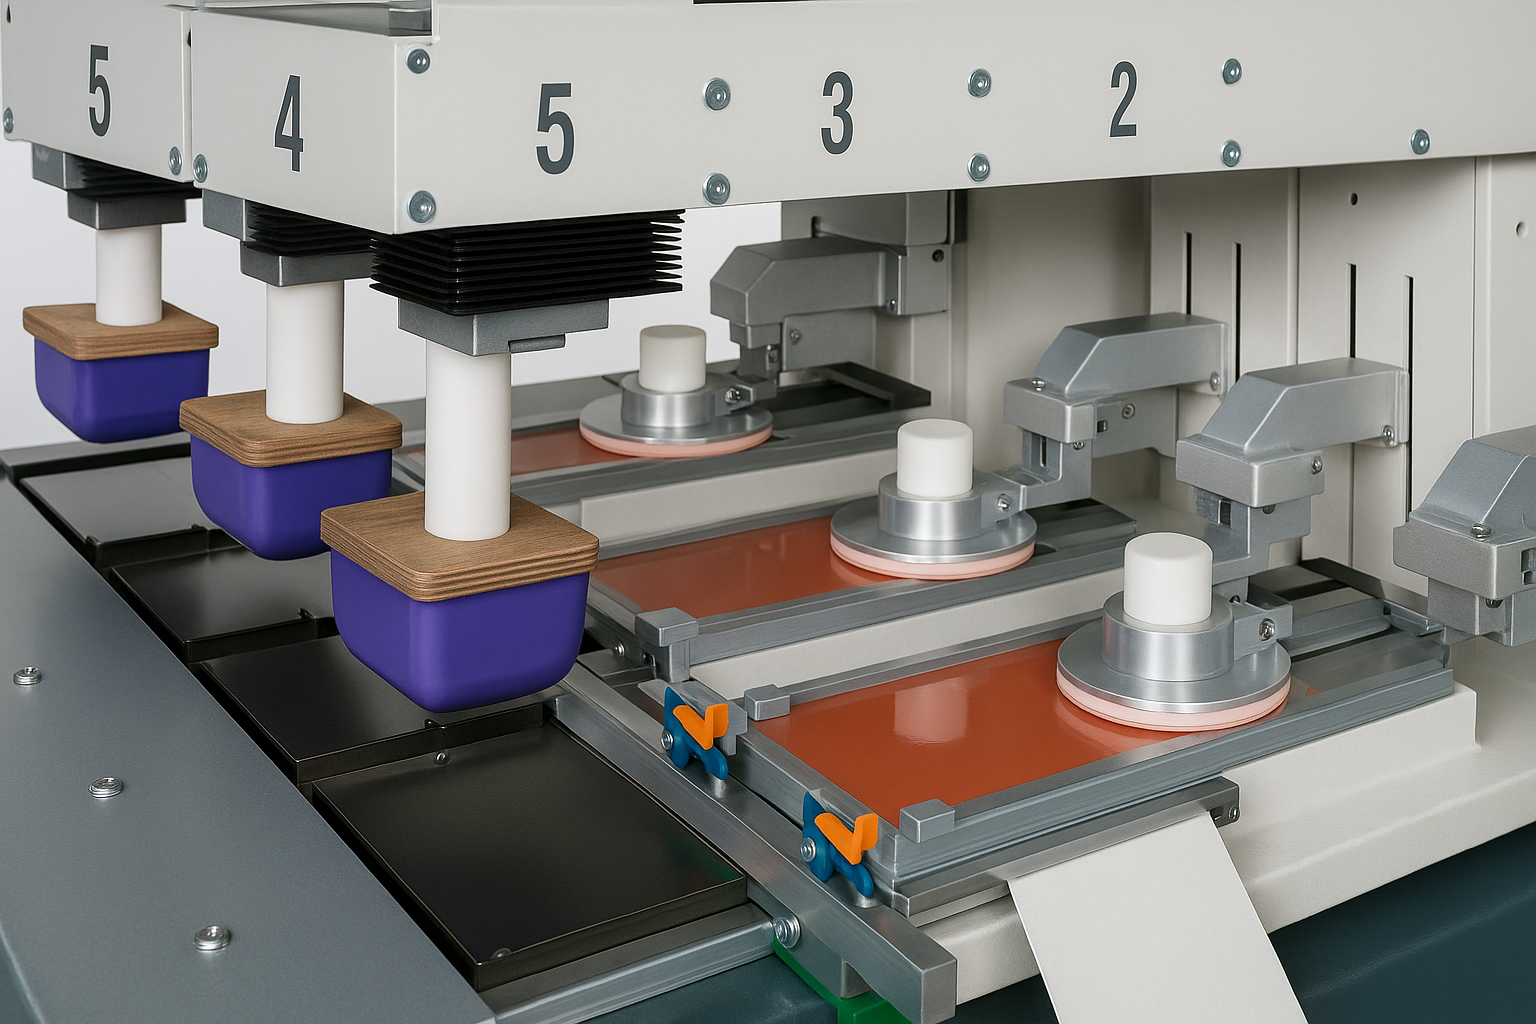
The Key Parts of a Pad Printing Machine Explained Simply
The Printing Machine (Pad Printer)
This is the main piece of equipment that does all the moving and pressing. There are different types:
Open Inkwell: Simple and versatile, but a bit messier.
Rotary Gravure: Great for printing around cylindrical objects.
Closed Ink Cup: Most popular because it’s cleaner, faster, and easy to use.
The Ink Cup
Think of this like a cup filled with ink that slides back and forth. Its job is to spread ink onto the engraved plate and scrape away the excess neatly. Usually, the cup has a ceramic ring at the edge that keeps things smooth and precise.
The Ink
Pad printing ink is special. It’s sticky enough to transfer clearly but flexible enough for different materials. It includes:
Pigments: These give the ink its color.
Thinners: Adjust how sticky or runny the ink is.
Resins: They help the ink stick well to the surface and resist wear.
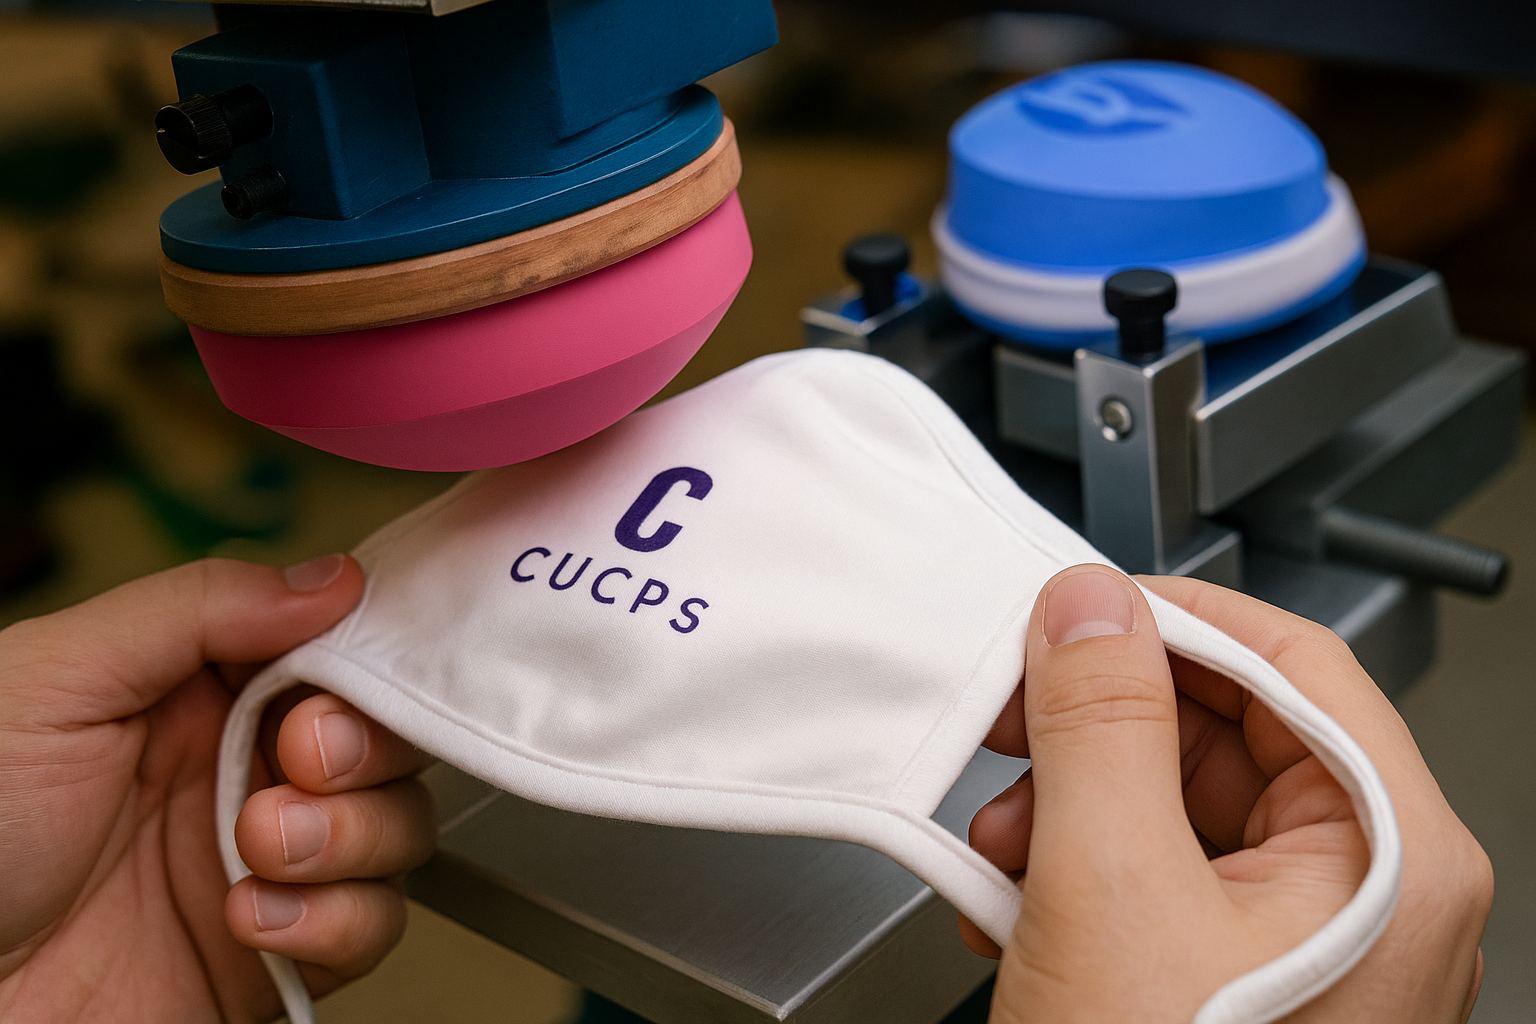
The Silicone Pad
The star of the show—soft, flexible, and made from silicone. It adapts easily to irregular shapes, grabbing the ink and gently pressing it onto the object. Pads vary in shape, hardness, and size, depending on your printing needs.
The Printing Plate
This flat plate holds your engraved design. It can be made of thin metal (affordable for small runs) or steel (durable and perfect for larger production volumes).
By breaking it down like this, the pad printing process becomes much clearer and easier to understand. It’s basically about picking up ink and stamping it precisely onto almost anything you can imagine.
Pad Printing vs. Screen Printing: Key Differences
When choosing a printing method, many people wonder, “Should I use pad printing or screen printing?” Both are popular, but each has its own strengths and weaknesses. Let’s take a closer look in easy-to-understand terms.
What Exactly is Screen Printing?
Screen printing works by pushing ink through a fine mesh screen that has parts blocked off to form your design. Think of it as using a stencil: ink gets squeezed through open spots onto the flat material below—usually fabric, paper, metal, or wood.
When to Choose Screen Printing:
Flat, larger surfaces: Ideal for T-shirts, posters, banners, and signs.
Bold colors: Great at creating vibrant, consistent colors.
Large quantities: Quick and efficient for bigger runs, like hundreds of shirts or promotional materials.
So, How is Pad Printing Different?
Pad printing is more like stamping. A soft silicone pad picks up ink from an engraved plate and presses it onto objects, even those with odd shapes or curves.
When to Choose Pad Printing:
Small or tricky shapes: Perfect for printing on items like pens, toys, or electronic components.
Precise detail: Handles intricate, tiny designs exceptionally well.
Flexibility: Works easily on uneven, curved, or textured surfaces.
Quick Comparison (Pad Printing vs. Screen Printing)
| Feature | Pad Printing | Screen Printing |
| Best for | Small, detailed, uneven surfaces | Large, flat surfaces |
| Image Detail | Excellent for small, precise detail | Good for bold designs, less precise |
| Cost & Setup | Affordable for small batches | Cost-effective for large quantities |
| Speed | Slower per print, great for smaller jobs | Faster, suited for larger jobs |
| Materials | Almost any material | Mostly fabrics, paper, flat items |
Which Should You Pick?
Pad printing if you’re dealing with small, detailed designs or irregular shapes (e.g., electronics, cosmetics packaging, toys, promotional items).
Screen printing if you’re printing larger, flat surfaces, especially in higher volumes (e.g., clothing, signage, posters).
Pros and Cons of Pad Printing
The Good Stuff (Pros)
Works on Almost Anything:
Whether your item is round, curved, textured, or uneven, pad printing can handle it smoothly.
Small Details, Big Results:
Pad printing shines when it comes to printing tiny, precise details. Logos, small texts, and intricate designs come out clear and sharp.
Easy to Use Multiple Colors:
Want multiple colors on your product? No problem. Pad printing lets you print multiple colors easily and clearly.
Friendly on Your Wallet:
Setting up a pad printing process doesn’t break the bank. It’s cost-effective, especially for smaller batches or custom prints.
Works with Different Materials:
Glass, metal, plastic, ceramics, even candies—pad printing inks stick nicely to just about anything.
The Not-So-Good (Cons)
Not Ideal for Large Areas:
Pad printing is great for small, detailed images, but struggles to print clearly over large, wide surfaces.
Slower Production Speeds:
Compared to methods like screen printing or digital printing, pad printing can be slower, especially if you’re printing many items quickly.
Color Consistency Issues:
If your design has big areas filled with one solid color, pad printing sometimes creates slight inconsistencies or unevenness.
Bottom Line:
Pad printing is fantastic for detailed images on tricky-shaped objects and smaller print runs. But if you’re printing big areas, large quantities quickly, or need very consistent large color blocks, other methods might be better.
What Kinds of Materials Can You Pad Print On?
Plastic
Plastic is one of the most common materials used in pad printing. Think of things like phone cases, buttons, toys, remote controls, or plastic packaging.
Why it works well: Pad printing inks stick really well to different types of plastic (like ABS, polypropylene, PVC, or nylon) and create sharp, long-lasting designs.
🧸 Example: Logos on toys, labels on plastic containers, or symbols on household gadgets.
Metal
Yup, you can pad print on metal too. Whether it’s brushed aluminum, stainless steel, or coated metal, the process works great.
Why it’s used: Pad printing gives a clean, professional look—perfect for branding or labeling metal tools, pens, electronics, or even car parts.
🔧 Example: A brand logo on a metal pen or model number on a steel tool.
Glass
You might think glass is too smooth or slippery, but pad printing can handle it—especially with the right type of ink.
Where it’s used: Mostly in cosmetics, bottles, or decorative products where labels or logos need to look stylish and clear.
🥂 Example: The brand name on a perfume bottle or measuring lines on a glass beaker.
Ceramic
Pad printing on ceramic is common in household products, medical parts, or decorative pieces.
Why it works: Ceramic has a stable surface that holds up well to printed inks, especially when cured properly.
🍵 Example: Patterns on mugs, labels on ceramic tiles, or markings on dental tools.
Wood
Even natural materials like wood can be pad printed—though surface texture and grain might affect the result a bit.
What to expect: A more rustic or natural look, depending on the type of wood and ink used.
🪵 Example: Logos on wooden gift boxes, coasters, or tool handles.
Paper & Cardboard
Sure, other printing methods like digital or screen printing might be more common for flat paper, but pad printing works for things like specialty packaging or 3D paper shapes.
📦 Example: Small logos on rigid cardboard boxes or paper tubes with curved surfaces.
Rubber & Silicone
Soft, flexible parts like rubber or silicone are no problem for pad printing—if the right ink is used.
Just be careful: These materials often need special inks and pretreatments to make sure the print sticks and doesn’t rub off.
🧤 Example: Text or graphics on rubber grips, seals, or silicone watch bands.
Industry Applications of Pad Printing
Pad printing’s adaptability has facilitated its broad adoption across multiple sectors:
Cosmetics: Labeling and decorative imaging on cosmetic packaging (bottles, caps, compacts).
Automotive: Durable identification, decorative graphics, and safety labeling on automotive components (switches, knobs, batteries).
Consumer Appliances: Logos, labels, and instructions on devices like laptops, remote controls, phones, keyboards.
Electronics: Detailed prints on connectors, relays, electronic housing units, and cables.
Medical Devices: High-precision printing with medical-grade inks on items such as insulin pens, catheters, inhalers, and implants, ensuring safety and traceability.
Factors to Consider During Pad Printing
Use the Right Machine for the Job
Not all pad printers are created equal. If you’re printing often or need high-quality results, go for a reliable, high-quality machine.
Closed ink cup machines are a solid choice—they’re clean, efficient, and consistent.
If your budget allows, look into automated machines. They speed things up and reduce the chance of human error.
🛠 Tip: Cheap machines might save money upfront but can cost you in wasted time and messed-up prints later.
Mix Your Ink the Right Way
Getting the perfect ink color and texture is key.
Use the right mix of ink, thinner, and hardener.
If you don’t have the exact color you need, you can mix custom colors—just make sure they match your design properly.
🎨 Tip: If you’re unsure, work with a trusted printing service provider who knows how to mix inks properly. It can save you a lot of trouble.
Pick the Right Pad
The pad is what actually transfers the image, so choosing the right one matters a lot.
Bigger pads are more stable and less likely to distort the image.
Harder pads give sharper, more detailed prints.
Steeper pads are great when printing on bumpy or oddly shaped parts—they help release trapped air for a cleaner print.
🧽 Tip: Don’t just grab any pad—test a few to see which one works best for your specific object.
Don’t Push Too Hard
You might think pressing harder gives a better print—but not with pad printing. Too much pressure can damage the pad or distort the image.
Adjust the downstroke on your machine so the pad presses just enough to transfer the ink cleanly.
If you’re seeing smudging or broken images, excessive pressure could be the reason.
⚙️ Tip: Check your machine regularly to make sure it’s working smoothly and not applying too much force.
Finishing Services Complementary to Pad Printing
Complementary finishing services enhance the durability, aesthetic appeal, and functionality of pad-printed products:
Bead blasting: Provides uniform matte finishes.
Anodizing (aluminum): Enhances corrosion resistance and color variety.
Powder coating: Adds durability, attractive finishes, and resistance to abrasion.
Passivation: Improves corrosion resistance for metal components, especially in medical or electronics industries.
Conclusion
Pad printing is a versatile, precise, and cost-effective method suitable for printing detailed images onto diverse and complex surfaces. By understanding the principles, equipment choices, and best practices outlined in this guide, manufacturers can leverage pad printing’s advantages effectively.
FAQs
Q: What factors affect printing pad longevity?
A: Longevity can be impacted by improper handling, contamination, machine malfunctions, and excessive pressure during operation.
Q: How accurate is a pad printer?
A: Pad printers can achieve extremely high accuracy, reliably reproducing fine details down to 25 microns (0.001 inches).
Q: How thick is the ink transferred during pad printing?
A: Pad printing typically transfers an ink layer ranging from 4 to 10 microns, ensuring crisp clarity and definition.
Here’s a full evaluation and optimization package for your article on Pad Printing, including feedback, an SEO meta description, internal linking suggestions, and recommended images with real online sources.
🔗 Internal Linking
CNC Machining for Custom Parts
Medical Device Manufacturing Guide
![]()