
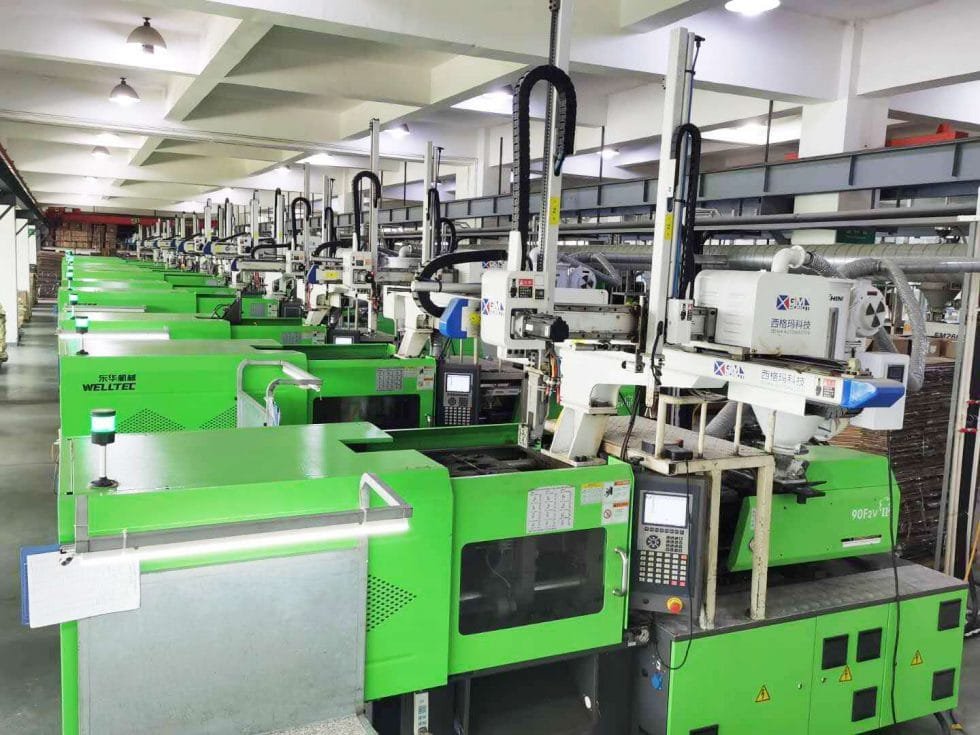
Plastic injection molding is one of the most widely used manufacturing processes for producing plastic parts at scale. It involves injecting molten thermoplastic material into a mold, allowing it to cool and solidify into a precise shape. This process enables manufacturers to produce millions of identical components quickly, with high accuracy and relatively low per-unit cost once the mold is built.
Injection molding is especially valuable for products with complex geometries—features such as thin walls, ribs, threads, and snap-fit joints can be achieved with a single cycle. Compared to other methods like machining or even 3D printing, injection molding offers unmatched efficiency for large-scale production. While 3D printing is useful for prototyping or low-volume runs, injection molding dominates in industries where speed, repeatability, and durability are crucial.
How It Works
The plastic injection molding process operates in a continuous loop. Each cycle includes the following key steps:
Feeding: Thermoplastic pellets are loaded into the hopper.
Melting: The pellets are heated inside the barrel, where the reciprocating screw mixes and compresses them until molten.
Injection: The screw pushes the molten material through the nozzle into the mold cavity under high pressure.
Filling and Venting: The plastic fills every detail of the mold cavity while air escapes through vents.
Cooling: The mold is temperature-controlled so the part solidifies uniformly without warping.
Ejection: Once cooled, the movable platen opens, and ejector pins push the finished part out.
This cycle repeats rapidly—anywhere from a few seconds to a few minutes depending on the material, part size, and complexity.
Components of an Injection Molding Machine
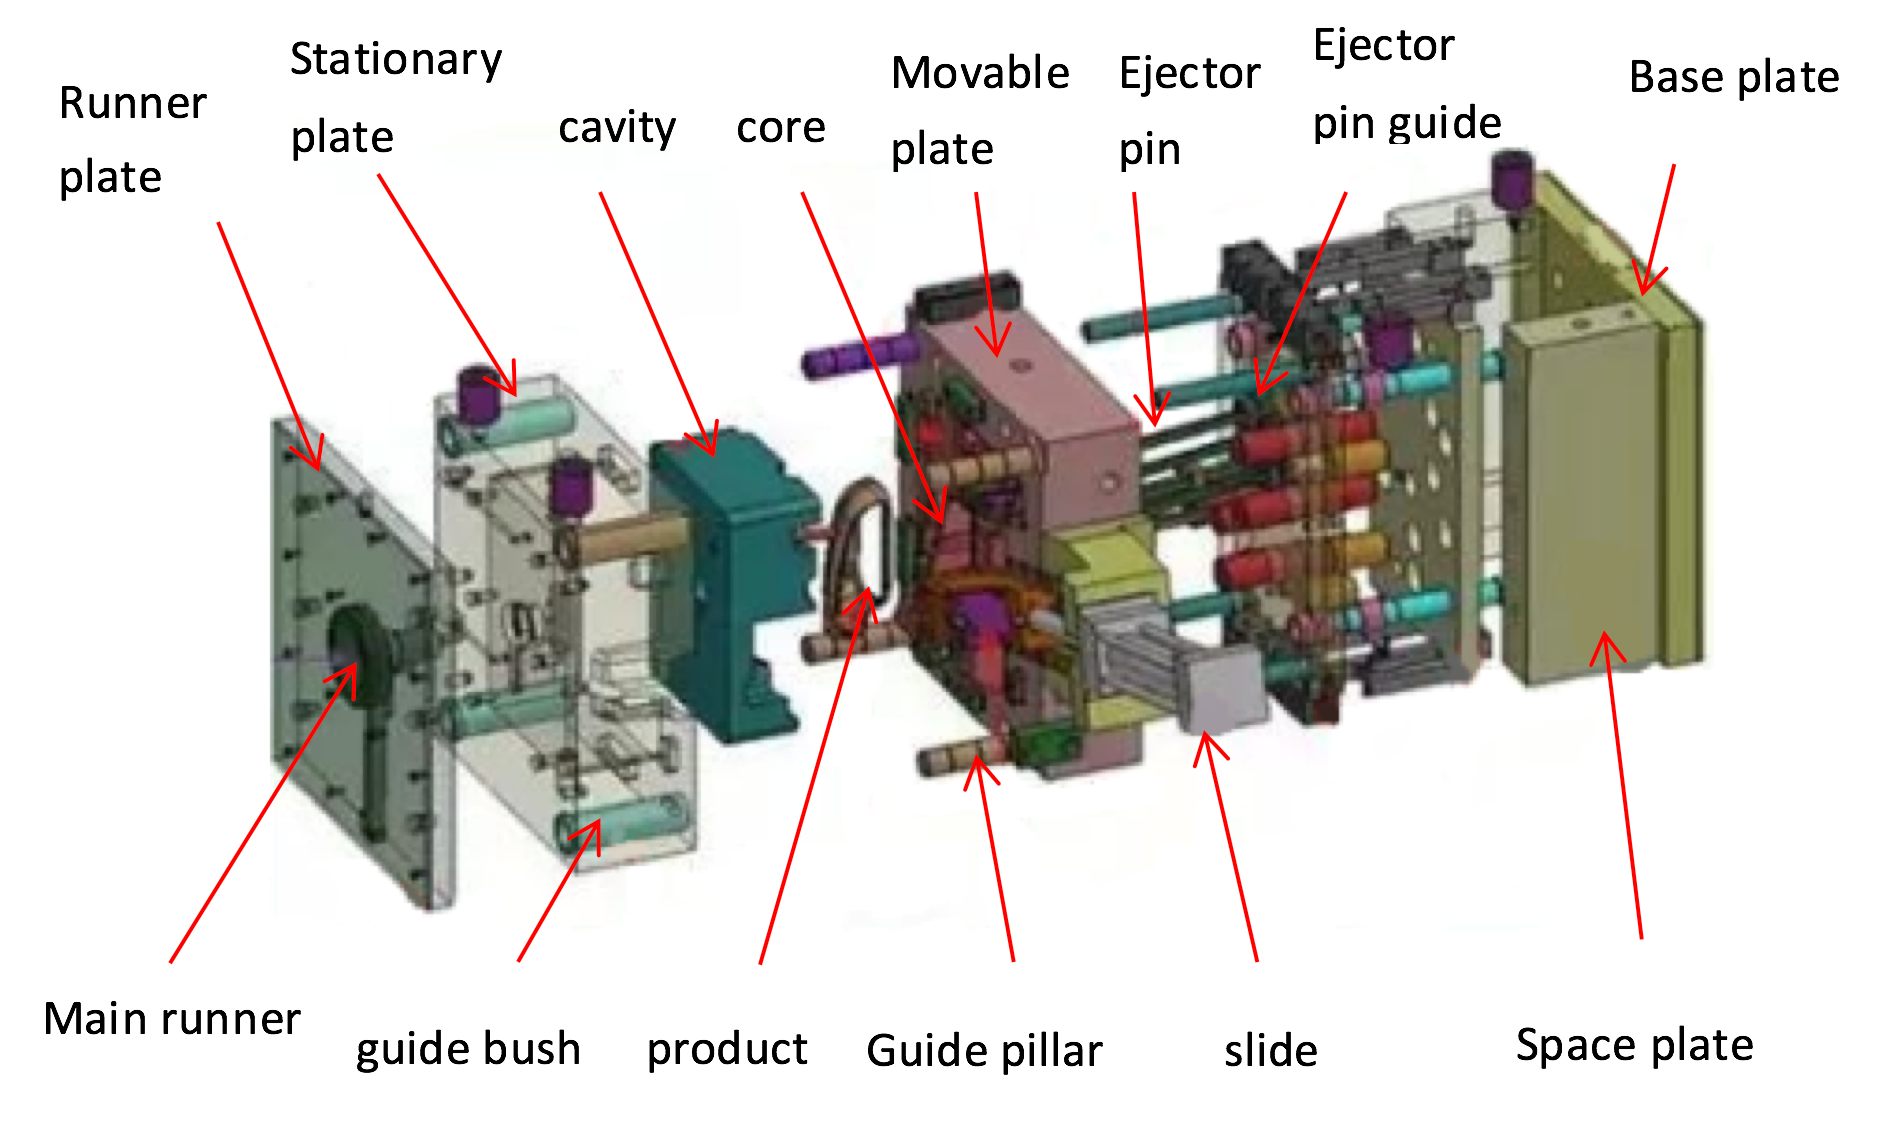
Components of an Injection Molding Machine
Injection molding machines are made up of several essential components, each with a distinct role:
Hopper: A funnel-shaped opening where plastic pellets are loaded. Often equipped with a dryer to remove moisture.
Barrel: A cylindrical chamber wrapped in heaters where pellets are melted.
Reciprocating Screw: A rotating, corkscrew-shaped shaft that mixes, compresses, and pushes molten plastic forward.
Heaters: External heating bands around the barrel that precisely control temperature.
Nozzle: A heated, tapered outlet that directs molten plastic into the mold.
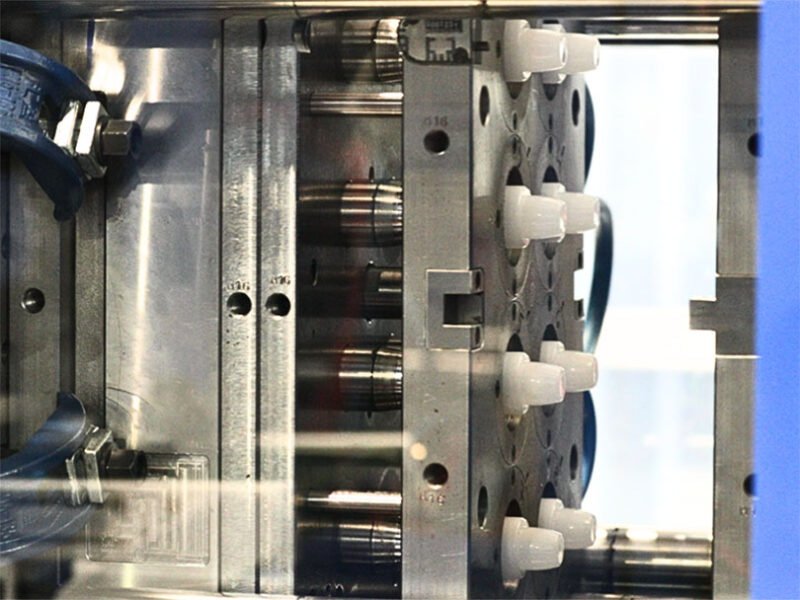
Mold: A precision-machined steel or aluminum block, usually consisting of two halves (core and cavity). Contains cooling channels, ejectors, and vents.
Mold Cavity: The hollow space inside the mold that shapes the final part.
Movable Platen: A sliding plate that clamps the mold shut during injection and opens it afterward.
Sprue, Runners, and Gates: Channels that guide the molten plastic from the nozzle into the mold cavity.
Ejector System: Pins or plates that push the cooled part out of the mold.
Understanding these components is critical for troubleshooting production issues, improving efficiency, and ensuring product quality.
Types of Injection Molding

Types of Injection Molding
Not all injection molding is the same. Depending on what you’re making, there are different versions of the process that can give you special results. Here are some of the most common types:
Standard Injection Molding
This is the “classic” method most people think of. Plastic pellets are melted, injected into a mold, cooled, and ejected. It’s used for everyday products like bottle caps, toys, and car parts.
Overmolding
With overmolding, you mold one material over another. For example, you might cover a hard plastic handle with a soft, rubbery grip. This is common in toothbrushes, power tools, and kitchen utensils.
Insert Molding
Here, a pre-made part (like a metal screw or a threaded insert) is placed inside the mold, and plastic is molded around it. It saves time and makes stronger, more reliable parts. Think of electrical connectors or plastic housings with built-in metal inserts.
Gas-Assisted Injection Molding
This method uses gas (usually nitrogen) to push the molten plastic into the mold. It creates hollow sections inside the part, which makes it lighter and uses less material—perfect for things like chair arms or automotive parts.
Thin-Wall Molding
As the name suggests, this is for parts with very thin walls, such as food packaging or medical containers. It needs very precise control because the plastic has to flow quickly before it cools down.
Micro Injection Molding
This is for making super tiny parts, sometimes smaller than a grain of rice. It’s often used in medical devices, electronics, or tiny mechanical components.
Reaction Injection Molding (RIM)
Instead of thermoplastics, this process uses liquid thermoset materials that react chemically inside the mold to form the part. It’s often used for large, lightweight parts like automotive bumpers.
Each type has its own pros and cons, but together they show just how flexible injection molding can be. Whether you need a giant car panel, a toothbrush grip, or a microchip component, there’s probably a molding method that fits the job.
Basic Design Principles for Injection Molding
When it comes to injection molding, good design is everything. If the part isn’t designed with the process in mind, you could end up with defects, wasted money, or a mold that doesn’t work at all. The good news is that there are a few simple rules that make your design “molding-friendly.”
Here are the basics:
Keep wall thickness consistent
Plastic doesn’t like to flow into areas with big changes in thickness. Thick walls cool slower than thin ones, which can cause warping, sink marks, or cracks. Try to keep the walls the same thickness everywhere, or make gradual transitions if you can’t.
Add draft angles
A draft angle is a slight taper (usually 1–3 degrees) on vertical walls. Without it, the part sticks to the mold like a suction cup, making it hard to eject. A little angle makes release smooth and easy.
Avoid sharp corners
Sharp 90° corners are weak spots where stress builds up, and they make it harder for plastic to flow. Rounded corners are stronger, easier to mold, and reduce the risk of cracks.
Use ribs for strength
Instead of making a wall thicker (which wastes material), you can add thin ribs for support. This makes the part stronger without adding much weight or cost.
Plan for undercuts
Undercuts (shapes that “lock” the part inside the mold) can complicate things. Sometimes you need slides, lifters, or special mold designs to handle them—which means more cost. If possible, avoid undercuts or find a simpler way to get the same function.
Add bosses and inserts the right way
Bosses (raised cylinders for screws or fasteners) should be supported with ribs to prevent breaking. If you need metal inserts, plan their placement carefully so they mold in cleanly.
Think about ejection
Your part will need to be pushed out of the mold by ejector pins. Place features like ribs, bosses, and walls in ways that won’t fight against this ejection process.
Use living hinges wisely
If you need a flexible connection (like on a flip-top bottle cap), thin plastic sections called living hinges can be designed into the part. But they only work well with certain plastics (like polypropylene).
Following these simple principles makes your part easier to mold, cheaper to produce, and less likely to fail in real use. In short: design smart from the beginning, and your mold (and wallet) will thank you later.
The Injection Molding Process in Detail
The Injection Molding Process in Detail
The process is more than simply injecting plastic into a mold—it is a carefully balanced system of heat, pressure, and cooling:
Loading: Raw pellets enter the hopper, sometimes pre-colored or mixed with additives (e.g., UV stabilizers, flame retardants).
Melting: The screw rotates inside the heated barrel, gradually melting and mixing the pellets into a homogeneous molten state.
Injection Phase: The screw moves forward like a plunger, pushing molten plastic through the nozzle into the mold cavity at pressures ranging from 500 to 20,000 psi.
Holding Pressure: Once the mold is filled, additional pressure is applied briefly to compensate for material shrinkage as it cools.
Cooling Phase: The mold’s cooling system (often water channels) maintains a steady temperature, solidifying the part evenly.
Ejection: The platen separates, ejector pins release the part, and the cycle restarts immediately.
This repeatable cycle ensures high-volume output with minimal downtime.
Getting Started with Injection Molding
1. Design Phase
The product design is the foundation of successful injection molding. Engineers typically create CAD models that follow specific molding guidelines:
Include functional features: bosses, ribs, snap-fit joints, and living hinges.
Maintain uniform wall thickness: to prevent warping and sink marks.
Use draft angles: on vertical surfaces for easier ejection.
Avoid design risks: such as sharp corners, extreme thickness changes, undercuts, or poorly placed holes.
Following Design for Manufacturability (DFM) principles at this stage reduces cost, improves mold longevity, and ensures consistent results.
2. Tooling Mold
The mold is the most expensive and time-consuming part of the entire process. It is typically made from hardened steel or aluminum using precision CNC machining and EDM (electrical discharge machining).
Complexity: Mold design must account for part geometry, cooling channels, sprues, runners, and ejector systems.
Timeframe: Fabrication and approval can take 12–20 weeks or more.
Cost: A mold can range from a few thousand to several hundred thousand dollars depending on size and complexity.
Because modifying a mold is expensive, it’s critical to finalize the design before machining begins.
Compatible Materials
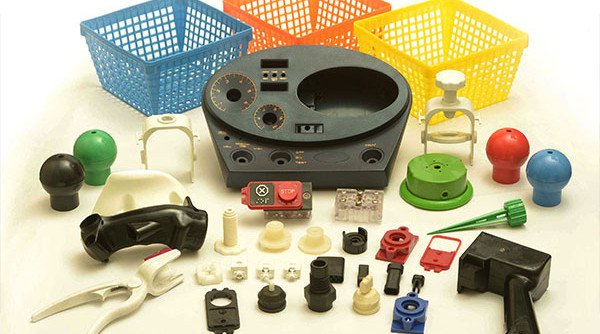
Injection molding is highly versatile, with dozens of thermoplastics available. Each material offers unique mechanical, thermal, and chemical properties.
Common Materials and Applications
Polypropylene (PP): Lightweight, fatigue-resistant; used in automotive parts, containers, and textiles.
High-density polyethylene (HDPE): Strong, durable, moisture-resistant; used in bottles, toys, and pipes.
Polystyrene (PS): Low-cost, easy to mold but brittle; used in packaging and disposable products.
Acrylonitrile butadiene styrene (ABS): Tough, machinable; popular in car parts, electronics housings, and toys like LEGO bricks.
Polycarbonate (PC): High impact resistance and transparency; used in eyewear, medical devices, and automotive lighting.
Nylon (PA): Strong, wear-resistant; used in gears, bearings, and textiles.
PVC: Flame-resistant and rigid; used in pipes, flooring, and electrical insulation.
Advanced plastics (PEEK, PEI, PPS): High-performance materials with heat and chemical resistance; used in aerospace, automotive, and medical industries.
Surface Finishes for Molded Parts
Surface Finishes for Molded Parts
When you make something with injection molding, the look and feel of the final part really matters. That’s where surface finishes come in. The “finish” is basically how smooth, shiny, or textured the outside of your part looks and feels. It’s not just about looks, though—it can also affect how the part works, how strong it is, and even how easy it is to clean.
Here are some of the most common surface finishes you’ll come across:
High Gloss / Polished Finish
This is the smooth, mirror-like finish that makes parts look shiny and fancy. It’s great for products where appearance is important, like phone cases or car interiors. The downside? Polishing takes time and can cost more.
Matte Finish
A matte finish looks softer, with less shine. It’s nice for products where you don’t want fingerprints all over the surface. It’s also easier on the eyes and gives parts a modern, clean look.
Textured Finish
Think of this as giving your part a “grip.” Texture can make something less slippery, hide scratches, or just give a cool design. Textures are often added with special patterns in the mold.
Semi-Gloss Finish
Right in the middle between shiny and matte. It’s a practical choice when you want a balance of style and function without going too extreme in either direction.
Special Finishes
Sometimes, you need something more custom—like patterns, logos, or even leather-like textures. These can make products stand out and feel more premium.
💡 Why surface finishes matter:
They affect how people see and feel about the product.
They can improve usability, like making a handle easier to hold.
They can even boost durability by hiding wear and tear.
So, when you’re designing a molded part, don’t just think about the shape—think about the finish too. It’s often the little detail that makes a big difference.
Why is Injection Molding Good?
Why is Injection Molding Good?
If you’ve ever wondered why so many products are made using injection molding, the answer is simple—it’s fast, efficient, and reliable. Once the mold is built, you can make thousands (or even millions) of identical parts without slowing down.
Here are some of the main reasons people love this process:
Speed: Each cycle only takes seconds to minutes. That means huge production numbers in a short time.
Consistency: Every part comes out almost exactly the same, which is great when you need tight tolerances.
Complex shapes: Injection molding can handle designs that would be really hard—or even impossible—to make with other methods, like tiny clips, thin walls, or living hinges.
Material choices: You can pick from a wide range of plastics, from everyday ones like polypropylene to advanced engineering plastics used in aerospace or medical devices.
Low cost per part: The mold can be pricey at first, but once it’s ready, the cost of each part drops a lot—perfect for mass production.
Strong and durable parts: Molded plastics can be tough, flexible, heat-resistant, or even transparent, depending on the material you choose.
In short, injection molding is good because it gives you speed, accuracy, and flexibility all at once. That’s why you’ll find it being used for everything—from car parts and phone cases to toys, kitchen tools, and medical equipment.
The Disadvantages of Injection Molding
While injection molding is a great way to make lots of plastic parts quickly, it’s not perfect. Like any process, it comes with a few downsides you should know about before jumping in.
High upfront cost: Making the mold is expensive. Depending on the size and complexity, it can cost thousands—or even hundreds of thousands—of dollars. That means injection molding only makes sense if you’re planning to produce a large number of parts.
Long lead time for molds: Building a mold isn’t something you can do overnight. It often takes weeks or months to design, machine, and test. If you need parts fast, this delay can be a big drawback.
Design limits: While injection molding can handle very complex shapes, the part design still has to follow certain rules. Things like thick walls, sharp corners, or undercuts can cause problems and may need extra work (or expensive mold features) to fix.
Material waste from sprues and runners: Even though most of the plastic goes into the part, some of it solidifies in the channels (sprues and runners). This waste can sometimes be recycled, but it still adds to the overall cost.
Not great for small runs: If you only need a few prototypes or low-volume parts, the cost and time of making a mold usually isn’t worth it. In those cases, 3D printing or CNC machining might be a better choice.
So, while injection molding is fantastic for mass production, it’s not always the right fit for smaller projects or when you need something quickly. Think of it like a marathon runner—it’s built for long distances, not for short sprints.
FAQs About Injection Molding
- How do I choose the best plastic for my part?
Consider mechanical requirements (strength, toughness, flexibility), environmental conditions (UV exposure, chemicals, temperature), and regulatory compliance (FDA approval for food-grade applications). - What materials can molds be made from?
Molds are typically made from hardened steel for high-volume production or aluminum for low to medium-volume runs. Steel molds are more durable but costlier and slower to produce. - How does injection molding differ from 3D printing?
Injection molding: Best for mass production, low per-unit cost, durable parts, limited flexibility after mold is made.
3D printing: Best for rapid prototyping and small production runs, flexible designs, higher per-unit cost, and limited material properties compared to molded plastics.
Conclusion
Plastic injection molding remains a cornerstone of modern manufacturing. Its ability to produce high volumes of precise, complex parts makes it indispensable in industries ranging from automotive and aerospace to consumer goods and medical devices.
By understanding the machine components, process workflow, design considerations, and material options, engineers and manufacturers can make informed decisions that reduce costs, minimize defects, and ensure high-quality results.
Whether you’re comparing it to 3D printing for prototypes or scaling up for full production, injection molding continues to prove itself as the most efficient and reliable plastic manufacturing process available.
![]()

1 thought on “All About the Basics of Plastic Injection Molding”