When it comes to plastic parts, functionality is not the only requirement. A product’s appearance matters just as much—especially in industries where consumer perception and aesthetics influence brand value. Injection molding is one of the most widely used manufacturing methods for producing plastic parts at scale. While efficient, the process is also prone to cosmetic defects that can negatively impact both quality and customer satisfaction.
In this article, we will discuss cosmetic standards for plastic parts, examine the most common cosmetic defects in injection molding, explore their causes, and provide practical solutions to avoid or fix them.
Cosmetic Standards for Plastic Parts
Cosmetic Standards for Plastic Parts
Before diving into specific defects, it’s important to understand how cosmetic quality is measured. Plastic parts are evaluated using standardized grading systems that define acceptable surface finishes and defect allowances.
Five grade levels of cosmetic standards:
Grade 1: Clear, transparent, or highly polished parts with the highest standards and minimal tolerance for defects.
Grade 2: Low-grade polish, clear transparent, or textured/non-textured parts with slightly more defect allowances.
Grade 3: Low-grade polish, non-textured parts where aesthetics are less critical.
Grade 4: Painted parts where surface imperfections may be hidden by coatings.
Grade 5: Ink stamped, silk-screened, printed, or otherwise decorated parts where surface finish beneath the decoration is less significant.
Each grade level sets expectations for manufacturers and clients. For example, Grade 1 parts demand exceptional precision, while Grade 5 parts may tolerate minor imperfections since the surface is covered.
Common Cosmetic Defects in Injection Molding
1. Flash
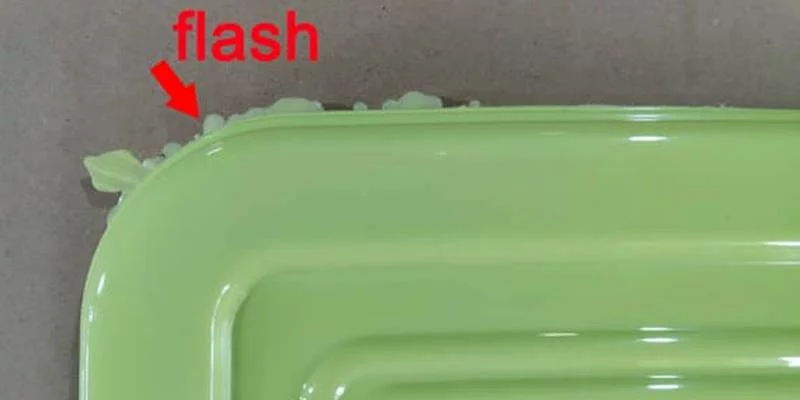
Common Cosmetic Defects in Injection Molding flash
Definition: Thin protrusions of plastic along the part’s edge caused when molten material escapes the mold cavity.
Causes:
Worn or damaged mold surfaces
Poorly designed or low-quality molds
Insufficient clamping force
Excessive injection pressure
Fixes:
Weld and recut parting lines
Build molds with precise straight locks
Increase clamp pressure
Reduce injection speed and pressure
Maintain and replace molds regularly
2. Sink Marks
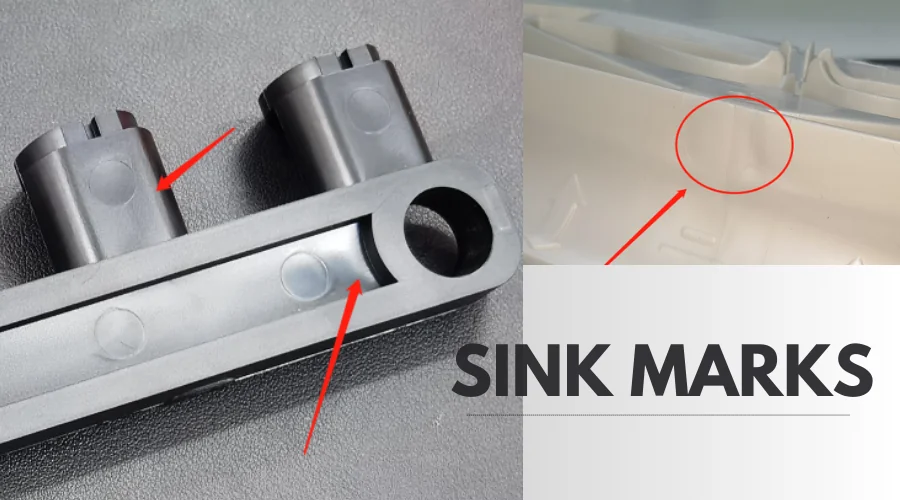
Sink Marks
Definition: Small depressions or craters on thicker sections of a part caused by uneven shrinkage.
Causes:
Poor part design with thick wall sections
Low cavity pressure
High gate or mold temperatures
Uneven cooling between thick and thin areas
Fixes:
Increase injection pressure and holding time
Optimize wall thickness (40–60% of the thickest section)
Reduce mold temperature
Modify part design to avoid bulky sections
3. Flow Lines
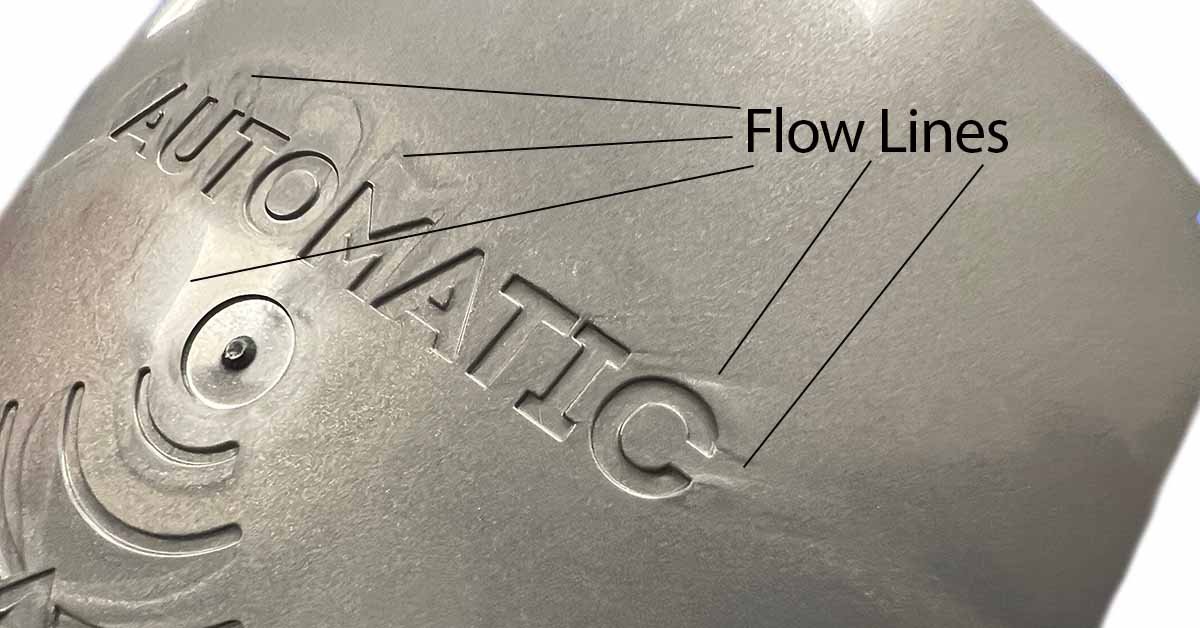
Flow Lines
Definition: Visible streaks, wavy patterns, or lines, usually near the gate area, caused by inconsistent plastic flow.
Causes:
Non-uniform wall thickness
Variations in cooling rate
Low injection pressure or slow fill speed
Fixes:
Ensure uniform wall thickness
Round sharp corners in design
Position gate near thinner walls
Increase injection speed and temperature
Apply mold surface lubricants if necessary
4. Knit Lines (Weld Lines)
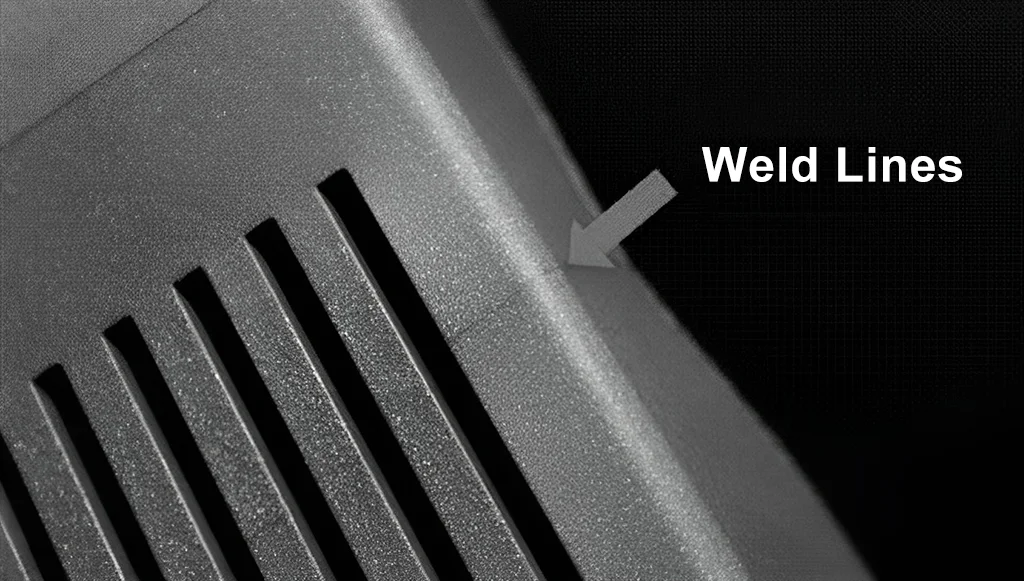
Knit Lines (Weld Lines)
Definition: Thin, crack-like lines where two melt fronts meet and fail to bond properly.
Causes:
Partial solidification before merging
Poor material flow
Inadequate gating system
Fixes:
Use a single gate when possible
Select low-viscosity materials
Increase melt temperature and pressure
Redesign parts to drill holes post-molding instead of molding them directly
5. Voids
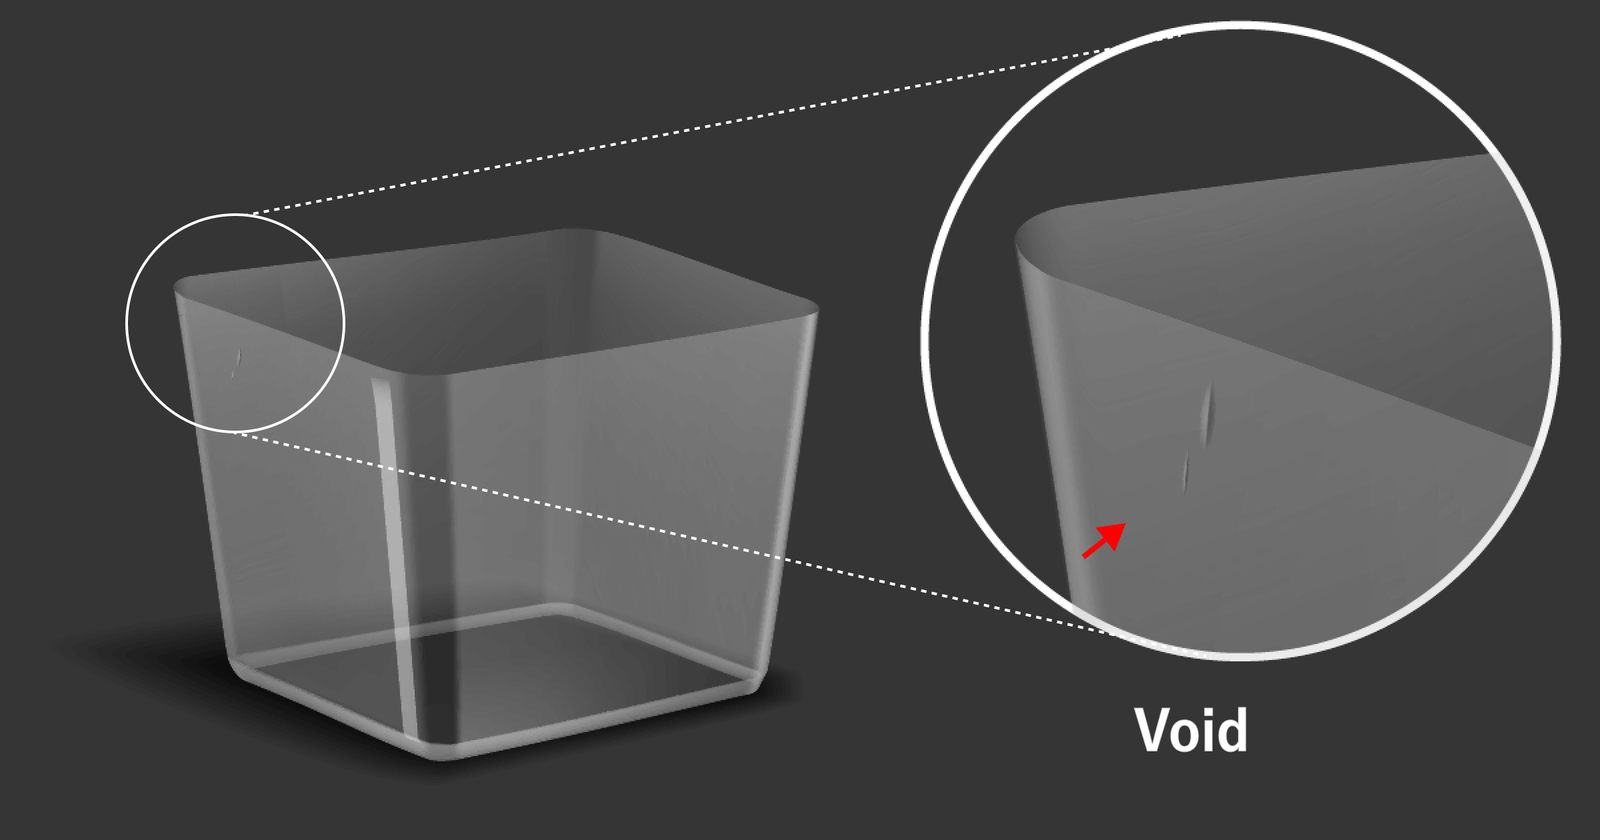
Voids
Definition: Air pockets or bubbles inside the molded part that compromise appearance and strength.
Causes:
Insufficient molding pressure
Thick wall sections cooling unevenly
Misaligned mold halves
Fixes:
Increase molding pressure
Align mold halves precisely
Reduce wall thickness
Place gates closer to thick sections
6. Discoloration
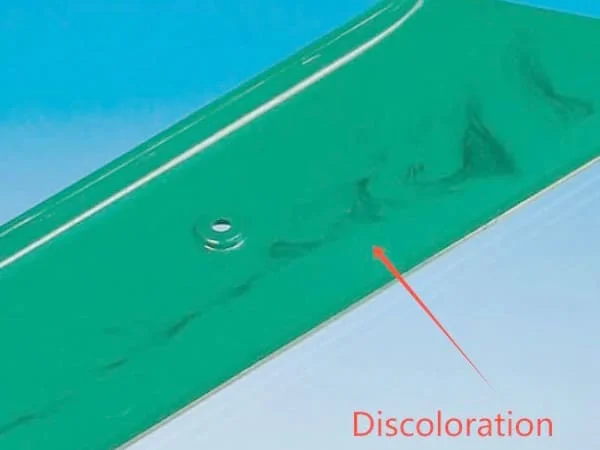
Discoloration
Definition: Unwanted streaks or patches of inconsistent color.
Causes:
Residual material in the nozzle
Contamination from previous production runs
Poor mixing of coloring agent
Excessive heating
Fixes:
Purge the injection molding machine regularly
Clean all equipment between runs
Mix raw materials thoroughly with coloring agents
Lower melt temperatures to avoid overheating pigments
7. Warping
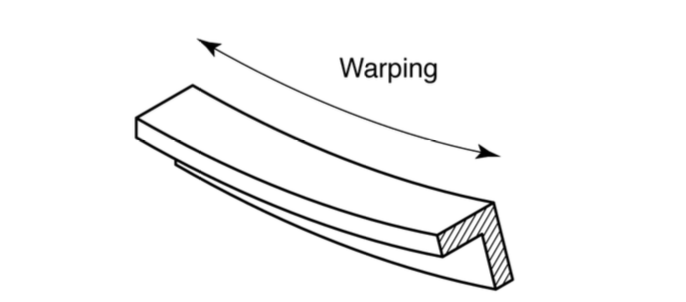
Warping
Definition: Twisting or bending of the part due to uneven shrinkage during cooling.
Causes:
Different cooling rates across the part
High-shrinkage materials
Uneven wall thickness
Fixes:
Use materials with low shrinkage properties
Ensure uniform wall thickness
Control and balance cooling across the mold
Gradually cool parts to reduce stress
8. Short Shots
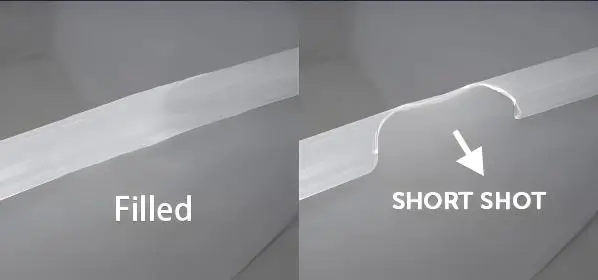
Short Shots
Definition: Incomplete filling of the mold cavity, leaving void areas or missing sections.
Causes:
Blocked gates
Insufficient injection pressure
High-viscosity materials
Low mold or melt temperature
Trapped air in cavities
Fixes:
Increase mold/melt temperature
Use larger or multiple gates
Add more vents for air release
Select less viscous plastics
Adjust injection speed and pressure
9. Jetting
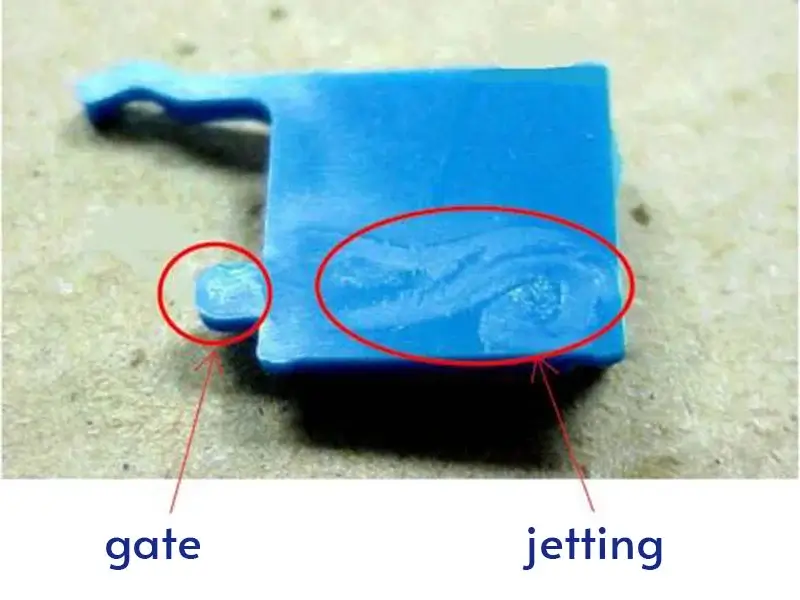
Jetting
Definition: Wavy, folded flow patterns on the surface caused by improper flow of molten plastic.
Causes:
Excessively high injection pressure
Low melt temperature preventing adhesion to mold surfaces
Fixes:
Increase melt and mold temperatures
Reduce injection pressure
Enlarge gate size to promote smoother flow
10. Burn Marks
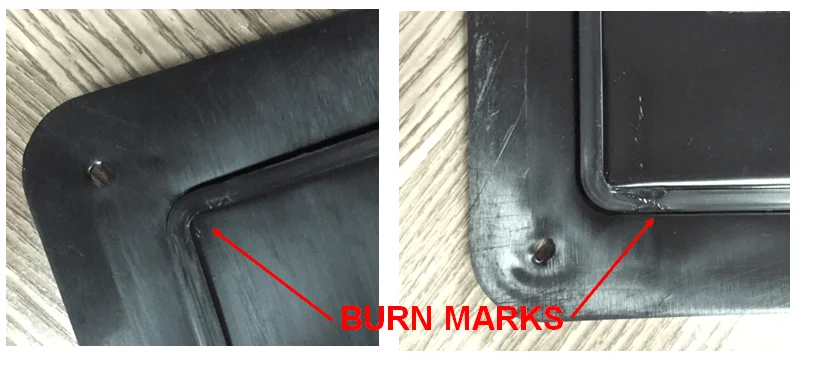
Burn Marks
Definition: Brown or black discolorations on the surface caused by overheating or trapped air.
Causes:
Resin degradation due to excessive heating
High injection speed trapping air inside
Fixes:
Lower melt and mold temperatures
Reduce injection speed
Add or enlarge venting channels
11. Surface Delamination
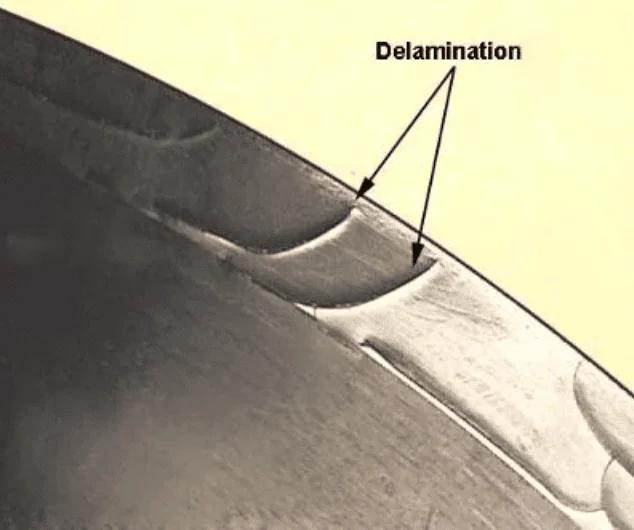
Surface Delamination
Definition: Peeling or flaking of thin surface layers, weakening part strength and appearance.
Causes:
Contaminated raw material
Residual moisture on pellets
Overreliance on mold release agents
Fixes:
Dry raw materials before molding
Store and handle materials properly
Redesign ejection mechanisms to reduce release agent use
Raise mold temperature for stronger bonding
Avoid sharp corners that concentrate stress
Best Practices for Avoiding Cosmetic Defects
Invest in high-quality mold design with uniform wall thickness, smooth flow paths, and proper gating.
Maintain molds regularly to prevent wear, misalignment, or buildup of contaminants.
Optimize processing parameters such as injection pressure, melt temperature, and cooling rates.
Choose materials wisely based on viscosity, shrinkage rates, and compatibility with intended finishes.
Implement in-process inspections to identify defects early in production and adjust settings quickly.
Conclusion
Cosmetic defects in injection molding are common but preventable. By understanding the causes and applying the right solutions—ranging from better mold design to optimized processing conditions—you can minimize rework, reduce scrap, and deliver parts that not only function well but also meet aesthetic standards.
For businesses, investing in prevention is far more cost-effective than fixing defects after production. Partnering with experienced injection molders ensures higher quality, better consistency, and reduced risks of cosmetic issues.
FAQs
- What are the most common cosmetic defects in injection molding?
The most frequent cosmetic defects include flash, sink marks, flow lines, knit lines (weld lines), voids, discoloration, warping, short shots, jetting, burn marks, and surface delamination. Each defect has different causes, such as poor mold design, uneven cooling, or incorrect processing parameters. - How can I prevent sink marks in injection-molded parts?
To reduce sink marks, ensure uniform wall thickness, increase injection pressure and holding time, and lower mold temperatures to improve cooling. Using ribs instead of thick walls in part design is also an effective strategy. - What is the difference between weld lines and flow lines?
Weld lines (knit lines): Appear as thin, crack-like lines where two flow fronts meet but fail to bond completely. They can weaken structural strength.
Flow lines: Appear as wavy streaks or discolorations caused by inconsistent plastic flow or uneven cooling. These mostly affect aesthetics but not functionality.
- Why does warping happen in injection molding?
Warping occurs when different areas of a molded part cool and shrink at different rates, creating internal stresses. Using materials with low shrinkage, ensuring uniform wall thickness, and controlling the cooling rate can minimize warping. - Can cosmetic defects affect part performance?
Yes. While some defects are purely cosmetic (like discoloration or flow lines), others—such as voids, weld lines, or delamination—can significantly weaken mechanical properties. For safety-critical applications, even minor defects must be carefully evaluated.
![]()