
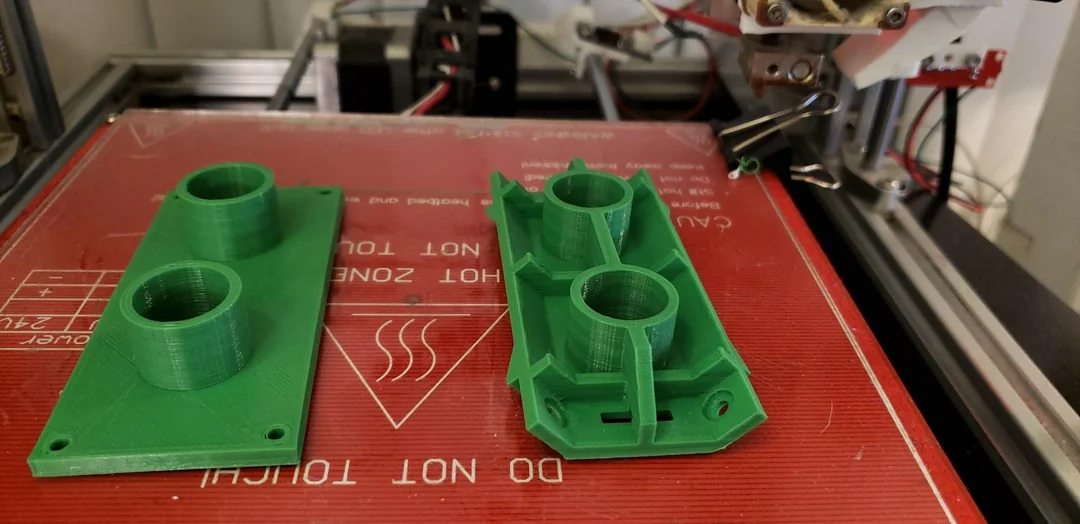
Las costillas son delgadas, características de soporte vertical que se encuentran comúnmente en piezas de plástico moldeadas por inyección. Sirven como estructuras de refuerzo que aumentan la rigidez y resistencia de una pieza sin agregar material excesivo o espesor de pared..
Las nervaduras correctamente diseñadas no sólo mejoran el rendimiento mecánico sino que también previenen defectos típicos de moldeo, como marcas de fregadero, vacío, y pandeo. Además de su papel estructural, Las costillas también se pueden utilizar como elementos de diseño estéticos o funcionales, ayudando a mejorar tanto la apariencia como el ajuste del ensamblaje.
Sin embargo, El diseño de las costillas debe manejarse con precisión.. Las proporciones o el espaciado incorrectos de las nervaduras pueden provocar un llenado deficiente del molde., ciclos de enfriamiento más largos, o incluso fallo parcial. Esta guía explora cuándo incorporar costillas., cómo diseñarlos de manera efectiva, y las mejores prácticas esenciales para el moldeo por inyección.
Por qué es importante el diseño adecuado de las costillas
Por qué es importante el diseño adecuado de las costillas
En el diseño de piezas de plástico., Mantener un espesor de pared constante es esencial para lograr un enfriamiento uniforme y una tensión residual mínima.. Pero aumentar el espesor de la pared para fortalecer un componente puede provocar efectos secundarios no deseados, como marcas de fregadero y pandeo.
Las costillas ofrecen una solución inteligente: Proporcionan refuerzo localizado. sin engrosar la pared, manteniendo así la capacidad de fabricación y reduciendo los costos de materiales.. Las costillas bien diseñadas pueden:
Aumentar la flexión y la rigidez torsional.
Evitar la deformación de la pieza bajo carga.
Soportes de montaje de soporte o juntas estructurales.
Mejore la resistencia al impacto mientras reduce el peso.
En cambio, costillas mal diseñadas, demasiado gruesas, demasiado alto, o demasiado cerca: puede atrapar aire, causar inconsistencias de enfriamiento, o producir defectos superficiales visibles.
Cuándo incorporar nervaduras en su diseño
Las nervaduras deben considerarse durante la fase inicial de diseño., especialmente en los siguientes escenarios:
Piezas que requieren refuerzo estructural. sin aumentar el espesor de la pared
Piezas grandes o complejas que necesitan rigidez localizada o estabilidad dimensional
Componentes bajo presión, torsión, o doblarse cargas (p.ej., cubiertas, carcasas)
Piezas livianas donde reducir el uso de materiales es fundamental para la rentabilidad
Cerramientos y carcasas donde se desean rigidez y suavidad estética
El uso estratégico de nervaduras ayuda a lograr un equilibrio óptimo entre rendimiento mecánico y capacidad de fabricación..
Directrices de diseño de costillas
Directrices de diseño de costillas
El diseño de nervaduras requiere una cuidadosa consideración de la geometría., espaciado, y relaciones de pared. Las siguientes pautas resumen las mejores prácticas para un diseño eficaz de nervaduras en piezas moldeadas por inyección..
Altura de la costilla
La altura de la nervadura afecta directamente la rigidez de la pieza., pero la altura excesiva puede causar problemas de llenado y acumulación de estrés..
Recomendado: La altura de las costillas debe no exceder 3 veces el espesor nominal de la pared.
Por qué: Las nervaduras más altas son propensas a deformarse, vacío, y mal llenado del molde.
Consejo: Utilice varias costillas cortas en lugar de una sola alta para una mejor distribución de la fuerza..
Espesor de la costilla
El espesor de las nervaduras es uno de los parámetros más críticos para evitar marcas de hundimiento..
Recomendado: El espesor de las costillas debe ser 40–60% del espesor nominal de la pared.
Por qué: Las costillas más gruesas se enfrían más lentamente que las áreas circundantes, provocando contracción y depresiones superficiales visibles.
Consejo: Mantenga siempre transiciones suaves desde la nervadura hasta la pared de la base para garantizar un enfriamiento uniforme.
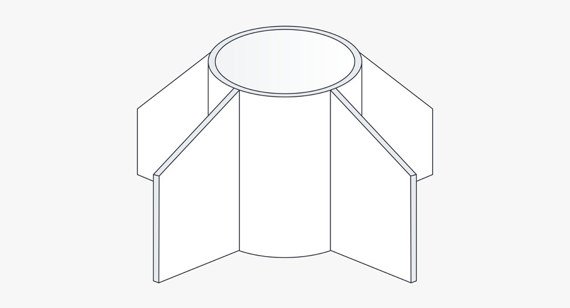
Costilla
La base de una costilla nunca debe formar una esquina afilada..
Recomendado: Añade un radio igual a 0.5–1× el espesor nominal de la pared en la base de las costillas.
Por qué: Las esquinas redondeadas distribuyen la tensión de manera uniforme y evitan grietas durante el uso o la expulsión..
Consejo: Haga coincidir el radio de la nervadura con el radio de la pared contigua para mantener rutas de flujo consistentes.
Espaciado de costilla
Cuando se utilizan varias costillas, el espaciado juega un papel importante tanto en el rendimiento del moldeo como en el comportamiento de enfriamiento.
Recomendado: Las costillas deben estar espaciadas 2–3 veces el espesor nominal de la pared aparte.
Por qué: Las nervaduras demasiado cerradas restringen el flujo de resina y atrapan el calor., aumentando el riesgo de marcas de hundimiento y tiempos de ciclo prolongados.
Consejo: Para paneles o cubiertas grandes, distribuir las nervaduras simétricamente para equilibrar la tensión y las velocidades de enfriamiento.
Ángulo de tiro de la costilla
Un ángulo de salida adecuado garantiza que la pieza pueda expulsarse suavemente del molde sin que se pegue ni se raye..
Recomendado: A calado mínimo de 0,5° por lado debe aplicarse a todas las costillas.
Excepción: Aplastar las costillas utilizado para ajustes de interferencia puede no tener borrador.
Consejo: Para costillas profundas, aumentar ligeramente el tiro (hasta 1°) para asegurar una expulsión limpia.
Resumen de las reglas de diseño de costillas
| Parámetro | Pauta |
| Altura de la costilla | ≤ 3× espesor de pared nominal |
| Espesor de la costilla | ≤ 60% de espesor de pared |
| Radio de costilla | 0.5–1× espesor de pared |
| Espaciado de costilla | 2–3× espesor de pared |
| Rit | ≥ 0,5° por lado |
Mejores prácticas de moldeo por inyección para el diseño de costillas
Incluso si la geometría de las nervaduras sigue las proporciones anteriores, Las prácticas de diseño adicionales son cruciales para garantizar un moldeo por inyección fluido y piezas de alta calidad..
Evite el exceso de nervaduras
Demasiadas nervaduras aumentan la complejidad del molde, prolongar el tiempo del ciclo, y dificultar la expulsión. En cambio, Aplicar nervaduras estratégicamente donde tengan el mayor beneficio estructural..
Asegúrese de una ventilación adecuada
Las trampas de aire suelen ocurrir cerca de las bases de las costillas o las intersecciones.. La ventilación adecuada en estas áreas evita defectos como tiros cortos, quemaduras, y achaflanar.
Mantenga un espesor de pared uniforme
Las nervaduras deben integrarse en las paredes con transiciones suaves para mantener un flujo de material y enfriamiento constantes.. Evite saltos bruscos de espesor, que puede conducir a marcas de fregadero o vacío.
Evite transiciones abruptas de fino a grueso
Diseñe cambios graduales entre regiones delgadas y gruesas para minimizar la tensión interna y los diferenciales de contracción..
Alinear nervaduras con rutas de carga
Cuando sea posible, Alinee las nervaduras en la dirección de la carga aplicada o del momento de flexión para obtener la máxima eficiencia del refuerzo..
Diseño para la fabricación (DFM) Consideraciones
Antes de la fabricación del molde, cada característica de la costilla debe validarse mediante DFM (Diseño para la fabricación) análisis.
Los puntos de control clave de DFM incluyen:
Verificación del espesor de las nervaduras y de los ángulos de desmoldeo.
Evaluación de la colocación de costillas para llenado y ventilación de moldes.
Simulación de uniformidad de enfriamiento y contracción.
Detección de posibles desafíos de expulsión y herramientas
Para obtener comentarios precisos, exporta tu 3D Archivos CAD en formato STEP y enviarlos a un socio de fabricación de confianza. En la máxima precisión (o proveedores de servicios similares), Los ingenieros revisan su diseño y le brindan una cotización e informe detallado DFM, garantizar que sus diseños de costillas estén listos para producción.
Conclusión
Las nervaduras son elementos fundamentales en el diseño de moldes de inyección de plástico, ofreciendo una forma inteligente de mejorar la resistencia y la rigidez sin sacrificar el peso ni la capacidad de fabricación. Siguiendo las pautas de diseño de nervaduras estándar, controlando la altura, espesor, espaciado, y borrador: puede mejorar significativamente el rendimiento del producto y la consistencia del moldeo..
El diseño cuidadoso de las nervaduras no solo previene defectos como marcas de hundimiento y deformaciones, sino que también reduce los tiempos de ciclo, mejora la apariencia de la pieza, y mejora la durabilidad a largo plazo.
Cuando se combina con una revisión DFM adecuada, La geometría optimizada de las nervaduras conduce a una alta calidad., Componentes de plástico rentables y adecuados para la producción en masa..
Listo para mejorar el diseño de su pieza?
Siga estas reglas de diseño de nervaduras y envíe sus modelos CAD para obtener una revisión gratuita del diseño para la fabricación y una cotización instantánea..
![]()


1 pensamiento en “Cómo diseñar nervaduras para piezas de plástico: Guía de diseño de moldeo por inyección”