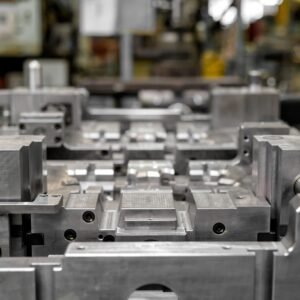
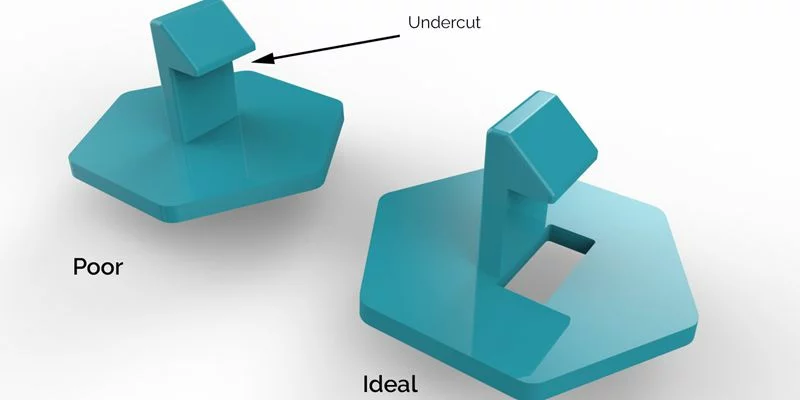
Los recortes son uno de los aspectos más desafiantes de moldeo por inyección de plástico diseño. Son las características que impiden que una pieza moldeada sea expulsada en un molde de extracción directa simple, generalmente porque la geometría bloquea la pieza dentro de la herramienta..
En moldeo por inyección, un vender a menor precio que puede tomar muchas formas: un agujero lateral, un surco, un receso, o un gancho que sobresale. Estas características a menudo agregan funcionalidades esenciales, como sujetar, caza de focas, o alineación, pero también hacen que la construcción del molde sea más compleja.
Los ejemplos comunes incluyen:
El hilos en un sujetador de plástico.
A ranura para un botón de encendido en la carcasa de un dispositivo.
Pestañas de bloqueo en una lente de luz trasera.
Jefes en ángulo o ranuras en carcasas mecánicas.
Si bien los recortes a menudo son inevitables, se pueden gestionar mediante ingeniería inteligente. Los siguientes seis métodos muestran cómo diseñar y moldear piezas con socavados de manera eficiente, sin sacrificar la calidad ni aumentar los costos..
1. Ajustar la línea de separación
Cambiando el molde línea de separación suele ser la forma más fácil de adaptarse a las socavaduras.
Modificando la orientación del molde o la geometría de separación., Puede colocar el corte para que se alinee con la línea de separación.. Esto permite que se forme por las dos mitades del molde y se libere limpiamente al momento de la expulsión..
Ejemplo:
Si su pieza incluye separadores laterales o pequeños jefes, mover la línea de separación y ajustar los ángulos de tiro puede eliminar la necesidad de mecanismos adicionales.
Ventajas:
Simplifica las herramientas y el mantenimiento..
Reduce el costo en comparación con las acciones secundarias..
Permite ciclos de moldeo más cortos..
Consideraciones:
Puede afectar las superficies cosméticas o la orientación de las piezas..
Requiere una evaluación cuidadosa del flujo de material y las rutas de enfriamiento..
Cuando la geometría u orientación de la pieza impide este método, acciones secundarias son la siguiente opción lógica.
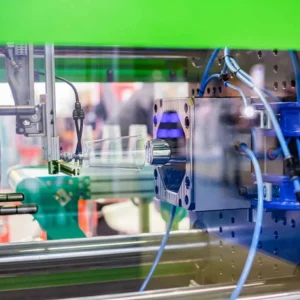
2. Usando acciones secundarias (Diapositivas de leva)
Acciones secundarias—también llamado diapositivas de leva—son elementos mecánicos del molde que se mueven perpendicularmente a la dirección de apertura del molde para formar características socavadas..
Cómo funcionan:
Cuando el molde se cierra, un pasador de leva coloca la acción lateral en su posición.
Después de la inyección y el enfriamiento., El molde se abre, y la acción lateral se retrae para eliminar el corte.
Aplicaciones Típicas:
Conectores de manguera y componentes tubulares.
Mangos, perillas de control, y conectores.
Piezas con orificios pasantes o rebajes perpendiculares a la línea de separación.
Especificaciones técnicas:
Ancho máximo: 8.419 en (213.84 milímetros)
altura máxima: 2.377 en (60.38 milímetros)
Viaje máximo: 2.900 en (73.66 milímetros)
Mejores materiales:
Resinas rígidas como nylon (Pensilvania), policarbonato (ordenador personal), y acetal (POM) son ideales. Materiales flexibles como PEBD o TPE puede pegarse durante la retracción, así que considere los golpes en su lugar.
Ventajas:
Permite características altamente detalladas y funcionales..
Mantiene una alta repetibilidad.
Adecuado para automatizado, producción de alto volumen.
Contras:
Aumenta la complejidad y el costo de las herramientas..
Requiere espacio para el movimiento de la leva dentro de la base del molde..
A pesar de la inversión adicional, Las acciones laterales son una de las formas más confiables de moldear características precisas de socavado..
3. Golpes (Desmontaje de socavados)
Golpes confiar en la elasticidad del plástico moldeado en lugar del movimiento mecánico. Este método es ideal para diseños de ajuste a presión, tapas de contenedores, y cubiertas flexibles.
Cómo funcionan:
Un suave, la plaquita redondeada forma el corte socavado. Durante la expulsión, la pieza se flexiona sobre la característica, permitiéndole “quitar” el núcleo del molde sin romperlo.
Materiales adecuados:
PEBD (Polietileno de baja densidad)
TPE (Elastómero termoplástico)
TPU (Poliuretano termoplástico)
Consejos de diseño:
Mantenga las transiciones graduales: evite los bordes afilados.
Limite la profundidad del corte para una liberación más fácil.
Utilice una placa eyectora para una presión de expulsión uniforme.
Ventajas:
Elimina partes móviles, reduciendo el mantenimiento.
Acorta los ciclos de moldeo..
Excelente para pequeños componentes flexibles.
Nota sobre el moldeado LSR:
Caucho de silicona líquida (LSR) El moldeado, debido a su flexibilidad, permite cortes aún más agresivos y geometrías complejas., convirtiéndolo en la mejor opción para sellos, juntas, y conectores flexibles.
4. Insertos cargados manualmente
Cuando se trata de geometrías complejas o tiradas de producción pequeñas, insertos cargados manualmente son una opción práctica.
que son:
Se trata de inserciones metálicas que se colocan manualmente en el molde antes de cada ciclo de inyección para bloquear determinadas cavidades o características.. Después del moldeado, el inserto se retira y se reutiliza.
Aplicaciones:
Carcasas para dispositivos médicos, recintos electrónicos, o cualquier parte donde las diapositivas automatizadas no sean rentables.
Ventajas:
Bajo costo de herramientas.
Ideal para prototipos y tiradas limitadas..
Evita acciones complejas del molde..
Limitaciones:
Tiempos de ciclo más lentos debido al manejo manual.
Requiere guantes resistentes al calor para la seguridad del operador..
El tamaño del inserto debe ser ergonómico, preferiblemente 0.5 pulgadas² o más grande, pero más pequeño que una baraja de cartas.
Este enfoque se utiliza ampliamente para la validación del diseño y las primeras etapas de producción donde la flexibilidad del molde es clave..
5. Telescópico (Corredizo) Apagones
Cierres telescópicos, También llamó cierres deslizantes, permitir que las secciones del molde se deslicen entre sí, Formando características de autobloqueo sin componentes móviles separados..
Cómo funcionan:
La mitad del molde incluye una proyección mecanizada que se “telescopio” hacia una cavidad correspondiente en el otro lado., cerrando efectivamente el flujo de material y dando forma al área socavada.
Aplicaciones:
Clips de ajuste a presión o mecanismos de cierre.
Articulaciones tipo gancho.
Componentes de gabinete entrelazados.
Beneficios:
Simplifica el diseño de herramientas.
Reduce el mantenimiento y el desgaste..
Elimina la necesidad de acciones laterales o inserciones..
Pautas de diseño:
Proporcionar al menos 3° de calado por lado para evitar la abrasión metal contra metal, brillante, o daño prematuro del moho.
6. Diseño de piezas optimizado y operaciones secundarias
Ni siquiera el mejor diseño de molde puede compensar una geometría deficiente de la pieza. Diseño para la fabricabilidad (DFM) sigue siendo crucial para un moldeado confiable.
Directrices clave:
Agregar ángulos de borrador (mínimo 1–3°) para una fácil expulsión.
Mantener espesor de pared uniforme para evitar deformaciones.
Usar costillas y radios para fortalecer superficies planas.
Quite el núcleo de las secciones gruesas para evitar marcas de hundimiento..
Aplicar acabados de superficie finos solo donde sea necesario.
Consejo de optimización de costos:
Para prototipos o piezas de bajo volumen, A menudo es más económico moldear una forma simple y mecanizar características complejas después de usar operaciones secundarias como taladrar o fresar.
Aprovechar las herramientas de DFM:
Cargue su modelo CAD en la plataforma de su fabricante para obtener un análisis DFM automatizado que detecte socavaduras., borradores de temas, e inconsistencias en el espesor de la pared antes de que comience la producción.
Recomendaciones finales
Los socavados son una parte natural del diseño de piezas complejas, pero con las estrategias adecuadas, no tienen por qué complicar tu proyecto.
Antes de finalizar el diseño de su molde:
Evalúe todos los cortes tempranos para minimizar los cambios de herramientas..
Considere el volumen de producción y las compensaciones de costos a largo plazo.
Analice sus opciones con expertos en diseño de moldes para identificar la solución más eficiente.
No pase por alto los métodos de posprocesamiento para realizar tiradas de producción más simples o más flexibles..
Necesita orientación profesional?
Póngase en contacto con nuestro equipo de soporte técnico o cargue su modelo CAD hoy para obtener una revisión DFM gratuita y una cotización instantánea.
Leer más:
Guía de diseño de ángulos de tiro & Mejores prácticas
Cómo diseñar nervaduras para piezas de plástico
¿Qué son las líneas de tejido en el moldeo por inyección y cómo prevenirlas?
Guía de selección de materiales para moldeo por inyección
![]()