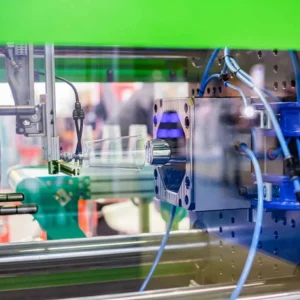
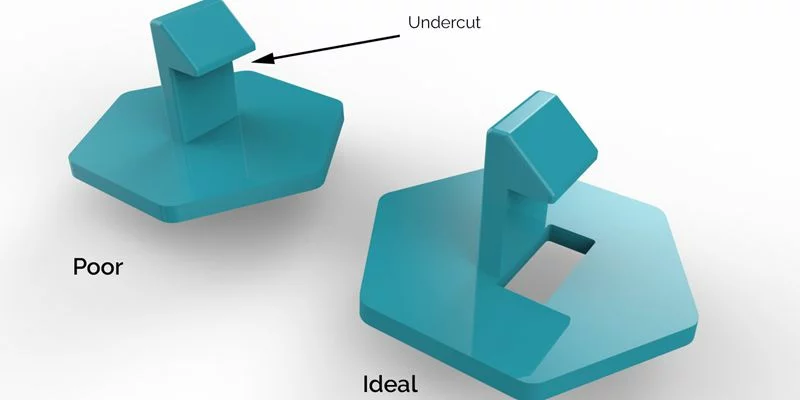
Les contre-dépouilles sont l'un des aspects les plus difficiles de moulage par injection plastique conception. Il s'agit de caractéristiques qui empêchent l'éjection d'une pièce moulée dans un simple moule à tirage direct, généralement parce que la géométrie verrouille la pièce dans l'outil..
En moulage par injection, un saper peut prendre plusieurs formes: un trou latéral, un sillon, une récréation, ou un crochet qui dépasse. Ces caractéristiques ajoutent souvent des fonctionnalités essentielles, telles que la fixation, scellage, ou l'alignement, mais ils rendent également la construction de moules plus complexe.
Les exemples courants incluent:
Le fils de discussion sur une attache en plastique.
UN fente pour un bouton d'alimentation sur le boîtier d'un appareil.
Onglets de verrouillage sur une lentille de feu arrière.
Patrons inclinés ou rainures dans les boîtiers mécaniques.
Même si les contre-dépouilles sont souvent inévitables, ils peuvent être gérés grâce à une ingénierie intelligente. Les six méthodes suivantes montrent comment concevoir et mouler efficacement des pièces avec des contre-dépouilles, sans sacrifier la qualité ni augmenter les coûts..
1. Ajustement de la ligne de séparation
Changer le moule ligne de séparation est souvent le moyen le plus simple de s'adapter aux contre-dépouilles.
En modifiant l'orientation du moule ou la géométrie de la pièce, vous pouvez positionner la contre-dépouille de manière à ce qu'elle s'aligne avec la ligne de séparation. Cela lui permet d'être formé par les deux moitiés du moule et de le démouler proprement lors de l'éjection..
Exemple:
Si votre pièce comprend des entretoises latérales ou des petits bossages, le déplacement de la ligne de séparation et l'ajustement des angles de dépouille peuvent éliminer le besoin de mécanismes supplémentaires.
Avantages:
Simplifie l'outillage et la maintenance.
Réduit les coûts par rapport aux actions secondaires.
Permet des cycles de moulage plus courts.
Considérations:
Peut affecter les surfaces cosmétiques ou l'orientation des pièces.
Nécessite une évaluation minutieuse du flux de matériaux et des chemins de refroidissement.
Lorsque la géométrie ou l'orientation de la pièce empêche cette méthode, actions secondaires sont le prochain choix logique.
2. Utiliser les actions secondaires (Diapositives à came)
Actions secondaires-également appelé diapositives à came-sont des éléments mécaniques du moule qui se déplacent perpendiculairement à la direction d'ouverture du moule pour former des éléments de contre-dépouille.
Comment ils fonctionnent:
Quand le moule se ferme, une goupille à came entraîne l'action latérale en position.
Après injection et refroidissement, le moule s'ouvre, et l'action latérale se rétracte pour effacer la contre-dépouille.
Applications typiques:
Raccords cannelés et composants tubulaires.
Poignées, boutons de commande, et connecteurs.
Pièces avec trous traversants ou évidements perpendiculaires à la ligne de joint.
Spécifications techniques:
Largeur maximale: 8.419 dans (213.84 mm)
Hauteur maximale: 2.377 dans (60.38 mm)
Déplacement maximum: 2.900 dans (73.66 mm)
Meilleurs matériaux:
Les résines rigides telles que nylon (Pennsylvanie), polycarbonate (PC), et acétal (POM) sont idéaux. Des matériaux flexibles comme PEBD ou TPE peut coller pendant la rétraction, alors pensez plutôt aux bosses.
Avantages:
Permet des fonctionnalités très détaillées et fonctionnelles.
Maintient une répétabilité élevée.
Convient pour automatisé, production en grand volume.
Les inconvénients:
Augmente la complexité et le coût de l'outillage.
Nécessite de l'espace pour le mouvement de la came dans la base du moule.
Malgré l'investissement supplémentaire, les actions latérales sont l'un des moyens les plus fiables de mouler des caractéristiques de contre-dépouille précises.
3. Bumpoffs (Décapage des contre-dépouilles)
Bumpoffs compter sur l'élasticité du plastique moulé plutôt que sur le mouvement mécanique. Cette méthode est idéale pour modèles à clipser, couvercles de conteneurs, et housses souples.
Comment ils fonctionnent:
Lisse, l'insert rayonné forme la contre-dépouille. Pendant l'éjection, la pièce fléchit sur la fonction, lui permettant de « cogner » le noyau du moule sans le déchirer.
Matériaux appropriés:
PEBD (Polyéthylène basse densité)
TPE (Élastomère thermoplastique)
TPU (Polyuréthane thermoplastique)
Conseils de conception:
Gardez les transitions progressives : évitez les arêtes vives.
Limiter la profondeur de contre-dépouille pour une libération plus facile.
Utilisez une plaque d'éjection pour une pression d'éjection uniforme.
Avantages:
Élimine les pièces mobiles, réduisant la maintenance.
Raccourcit les cycles de moulage.
Excellent pour les petits composants flexibles.
Remarque sur le moulage LSR:
Caoutchouc de silicone liquide (LSR) le moulage, grâce à sa flexibilité, permet des contre-dépouilles encore plus agressives et des géométries complexes, ce qui en fait un premier choix pour les phoques, joints, et connecteurs flexibles.
4. Inserts chargés à la main
Lorsqu'il s'agit de géométries complexes ou de petites séries de production, inserts chargés à la main sont une option pratique.
Ce qu'ils sont:
Il s'agit d'inserts métalliques placés manuellement dans le moule avant chaque cycle d'injection pour bloquer certaines cavités ou éléments.. Après moulage, l'insert est retiré et réutilisé.
Applications:
Boîtiers pour dispositifs médicaux, enclos électroniques, ou toute pièce où les diapositives automatisées ne sont pas rentables.
Avantages:
Faible coût d’outillage.
Idéal pour les prototypes et les séries limitées.
Évite les actions complexes des moisissures.
Limites:
Temps de cycle plus lents grâce à la manipulation manuelle.
Nécessite des gants résistants à la chaleur pour la sécurité de l'opérateur.
La taille de l'insert doit être ergonomique, de préférence 0.5 po² ou plus grand, mais plus petit qu'un jeu de cartes.
Cette approche est largement utilisée pour la validation de la conception et les premières étapes de production où la flexibilité du moule est essentielle..
5. Télescopique (Glissement) Arrêts
Fermetures télescopiques, également appelé fermetures coulissantes, permettre aux sections du moule de glisser les unes dans les autres, formant des éléments autobloquants sans composants mobiles séparés.
Comment ils fonctionnent:
Une moitié du moule comprend une saillie usinée qui se « télescope » dans une cavité correspondante de l'autre côté., interrompant efficacement le flux de matériaux et façonnant la zone de contre-dépouille.
Applications:
Clips à clipser ou mécanismes de verrouillage.
Joints en forme de crochet.
Composants du boîtier verrouillables.
Avantages:
Simplifie la conception des outils.
Réduit l’entretien et l’usure.
Élimine le besoin d'actions secondaires ou d'inserts.
Directives de conception:
Fournir au moins 3° de tirant d'eau par côté pour éviter l'abrasion métal sur métal, clignotant, ou des dommages prématurés causés par la moisissure.
6. Conception de pièces optimisée et opérations secondaires
Même la meilleure conception de moule ne peut compenser une mauvaise géométrie des pièces. Conception pour la fabricabilité (DFM) reste crucial pour un moulage fiable.
Lignes directrices clés:
Ajouter angles de dépouille (minimum 1–3°) pour une éjection facile.
Maintenir épaisseur de paroi uniforme pour éviter la déformation.
Utiliser côtes et rayons pour renforcer les surfaces planes.
Évidez les sections épaisses pour éviter les marques d'évier.
Appliquer finitions de surface fines seulement là où c'est nécessaire.
Conseil d'optimisation des coûts:
Pour prototypes ou pièces en faible volume, il est souvent plus économique de mouler une forme simple et d'usiner ensuite des caractéristiques complexes en utilisant opérations secondaires comme le perçage ou le fraisage.
Tirer parti des outils DFM:
Téléchargez votre modèle CAO sur la plate-forme de votre fabricant pour une analyse DFM automatisée qui signale les contre-dépouilles, projets de questions, et incohérences d'épaisseur de paroi avant le début de la production.
Recommandations finales
Les contre-dépouilles font naturellement partie de la conception de pièces complexes, mais avec les bonnes stratégies, ils ne doivent pas compliquer votre projet.
Avant de finaliser la conception de votre moule:
Évaluez toutes les contre-dépouilles dès le début pour minimiser les changements d'outillage.
Tenir compte des compromis liés au volume de production et aux coûts à long terme.
Discutez de vos options avec des experts en conception de moules pour identifier la solution la plus efficace..
Ne négligez pas les méthodes de post-traitement pour des cycles de production plus simples ou plus flexibles.
Besoin de conseils professionnels?
Contactez notre équipe de support technique ou téléchargez votre modèle CAO dès aujourd'hui pour un examen DFM gratuit et un devis instantané.
En savoir plus:
Guide de conception des angles de dépouille & Meilleures pratiques
Comment concevoir des nervures pour des pièces en plastique
Que sont les lignes de tricot dans le moulage par injection et comment les éviter
Guide de sélection des matériaux pour le moulage par injection
![]()